RI Fraud Classification Walkthrough
▶️ Try this in Colab! Run the RI Fraud Classification Walkthrough in Google Colab.
You are a data scientist at a Payment Processing Company. The data science team has been tasked with implementing a Fraud Detection model and monitoring how that model performs over time. The performance of this fraud detection model directly impacts the costs of the company. In order to ensure the data science team develops the best model and the performance of this model doesn’t degrade over time, the VP of Data Science purchases the RIME platform.
In this Notebook Walkthrough, we will walkthrough 2 of RIME’s core products - AI Stress Testing and AI Continuous Testing.
AI Stress Testing is used in the model development stage. Using AI Stress Testing you can test the developed model. RIME goes beyond simply optimizing for basic model performance like accuracy and automatically discovers the model’s weaknesses.
AI Continuous Testing is used after the model is deployed in production. Using AI Continuous Testing, you can automate the monitoring, discovery and remediation of issues that occur post-deployment.
Install Dependencies, Import Libraries and Download Data
Run the cell below to install libraries to receive data, install our SDK, and load analysis libraries.
[ ]:
!pip install rime-sdk &> /dev/null

import pandas as pd
from pathlib import Path
from rime_sdk import Client
[ ]:
!pip install https://github.com/RobustIntelligence/ri-public-examples/archive/master.zip

from ri_public_examples.download_files import download_files

download_files('tabular-2.0/fraud', 'fraud')
Establish the RIME Client
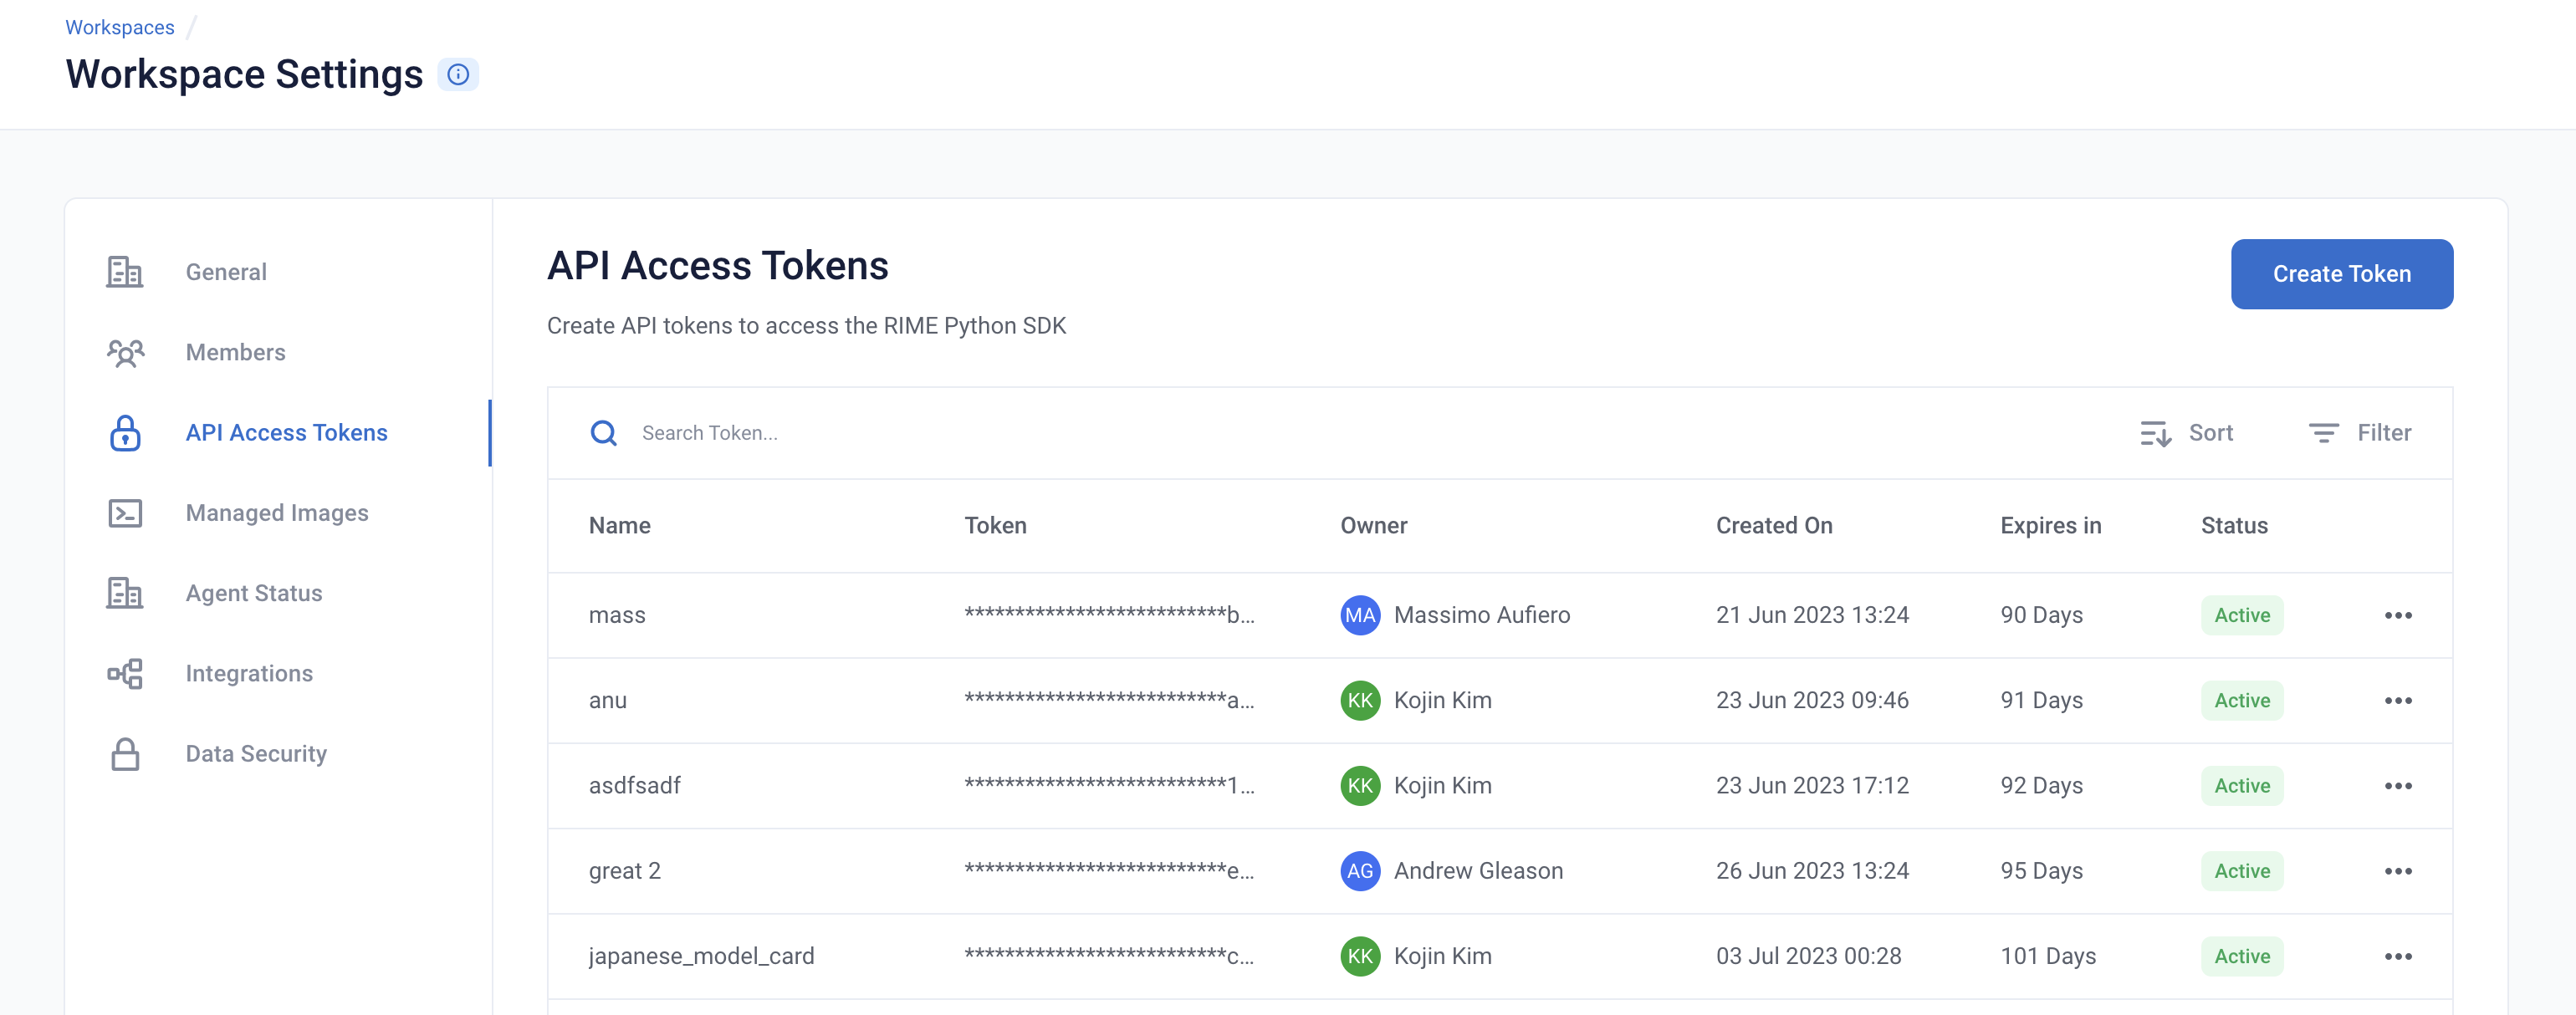
To get started, provide the API credentials and the base domain/address of the RIME service. You can generate and copy an API token from the API Access Tokens Page under Workspace settings. For the domian/address of the RIME service, contact your admin.

[ ]:
API_TOKEN = '' # PASTE API_KEY
CLUSTER_URL = '' # PASTE DEDICATED DOMAIN OF RIME SERVICE (eg: rime.stable.rbst.io)
AGENT_ID = '' # PASTE AGENT_ID IF USING AN AGENT THAT IS NOT THE DEFAULT
[ ]:
client = Client(CLUSTER_URL, API_TOKEN)
Create a New Project
You can create projects in RIME to organize your test runs. Each project represents a workspace for a given machine learning task. It can contain multiple candidate models, but should only contain one promoted production model.
[ ]:
description = (
    "Run Stress Testing and Continuous Testing on a tabular"
    " binary classification model and dataset. Demonstration uses a"
    " dataset that simulates credit card fraud detection."
)
project = client.create_project(
    name='Tabular Binary Classification Demo',
    description=description,
    model_task='MODEL_TASK_BINARY_CLASSIFICATION'
)
Go back to the UI to see the new Fraud Demo Project.
Uploading the Model + Datasets
Let’s first take a look at what the dataset looks like:
[ ]:
df = pd.read_csv(Path('fraud/data/fraud_ref.csv'))
df.head()
For this demo, we are going to use a pretrained CatBoostClassifier Model.
The model predicts whether a particular transaction is fraud or not fraud.
The model makes use of the following features -
category
card_type
card_company
transaction_amount
browser_version
city
country
We now want to kick off RIME Stress Tests that will help us evaluate the model in further depth beyond basic performance metrics like accuracy, precision, recall. In order to do this, we will upload this pre-trained model, the reference dataset the model was trained on, and the evaluation dataset the model was evaluated on to an S3 bucket that can be accessed by RIME.
[ ]:
upload_path = "ri_public_examples_fraud"

model_s3_dir = client.upload_directory(
    Path('fraud/models'), upload_path=upload_path
)
model_s3_path = model_s3_dir + "/fraud_model.py"

ref_s3_path = client.upload_file(
    Path('fraud/data/fraud_ref.csv'), upload_path=upload_path
)
eval_s3_path = client.upload_file(
    Path('fraud/data/fraud_eval.csv'), upload_path=upload_path
)

ref_preds_s3_path = client.upload_file(
    Path("fraud/data/fraud_ref_preds.csv"), upload_path=upload_path
)
eval_preds_s3_path = client.upload_file(
    Path("fraud/data/fraud_eval_preds.csv"), upload_path=upload_path
)
Once the data and model are uploaded to S3, we can register them to RIME. Once they’re registered, we can refer to these resources using their RIME-generated ID’s.
[ ]:
from datetime import datetime

dt = str(datetime.now())

# Note: models and datasets need to have unique names.
model_id = project.register_model_from_path(f"model_{dt}", model_s3_path, agent_id=AGENT_ID)

ref_dataset_id = project.register_dataset_from_file(
    f"ref_dataset_{dt}", ref_s3_path, data_params={"label_col": "label"}, agent_id=AGENT_ID
)
eval_dataset_id = project.register_dataset_from_file(
    f"eval_dataset_{dt}", eval_s3_path, data_params={"label_col": "label"}, agent_id=AGENT_ID
)

project.register_predictions_from_file(
    ref_dataset_id, model_id, ref_preds_s3_path, agent_id=AGENT_ID
)
project.register_predictions_from_file(
    eval_dataset_id, model_id, eval_preds_s3_path, agent_id=AGENT_ID
)
Running a Stress Test
AI Stress Tests allow you to test your data and model before deployment. They are a comprehensive suite of hundreds of tests that automatically identify implicit assumptions and weaknesses of pre-production models. Each stress test is run on a single model and its associated reference and evaluation datasets.
Below is a sample configuration of how to setup and run a RIME Stress Test.
[ ]:
stress_test_config = {
    "run_name": "Onboarding Stress Test Run",
    "data_info": {
        "ref_dataset_id": ref_dataset_id,
        "eval_dataset_id": eval_dataset_id,
    },
    "model_id": model_id,
    "categories": [
            "TEST_CATEGORY_TYPE_ADVERSARIAL",
            "TEST_CATEGORY_TYPE_SUBSET_PERFORMANCE",
            "TEST_CATEGORY_TYPE_TRANSFORMATIONS",
            "TEST_CATEGORY_TYPE_ABNORMAL_INPUTS",
            "TEST_CATEGORY_TYPE_DATA_CLEANLINESS"]
}
stress_job = client.start_stress_test(
    stress_test_config, project.project_id, agent_id=AGENT_ID
)
stress_job.get_status(verbose=True, wait_until_finish=True)
Wait for a couple minutes and your results will appear in the UI.
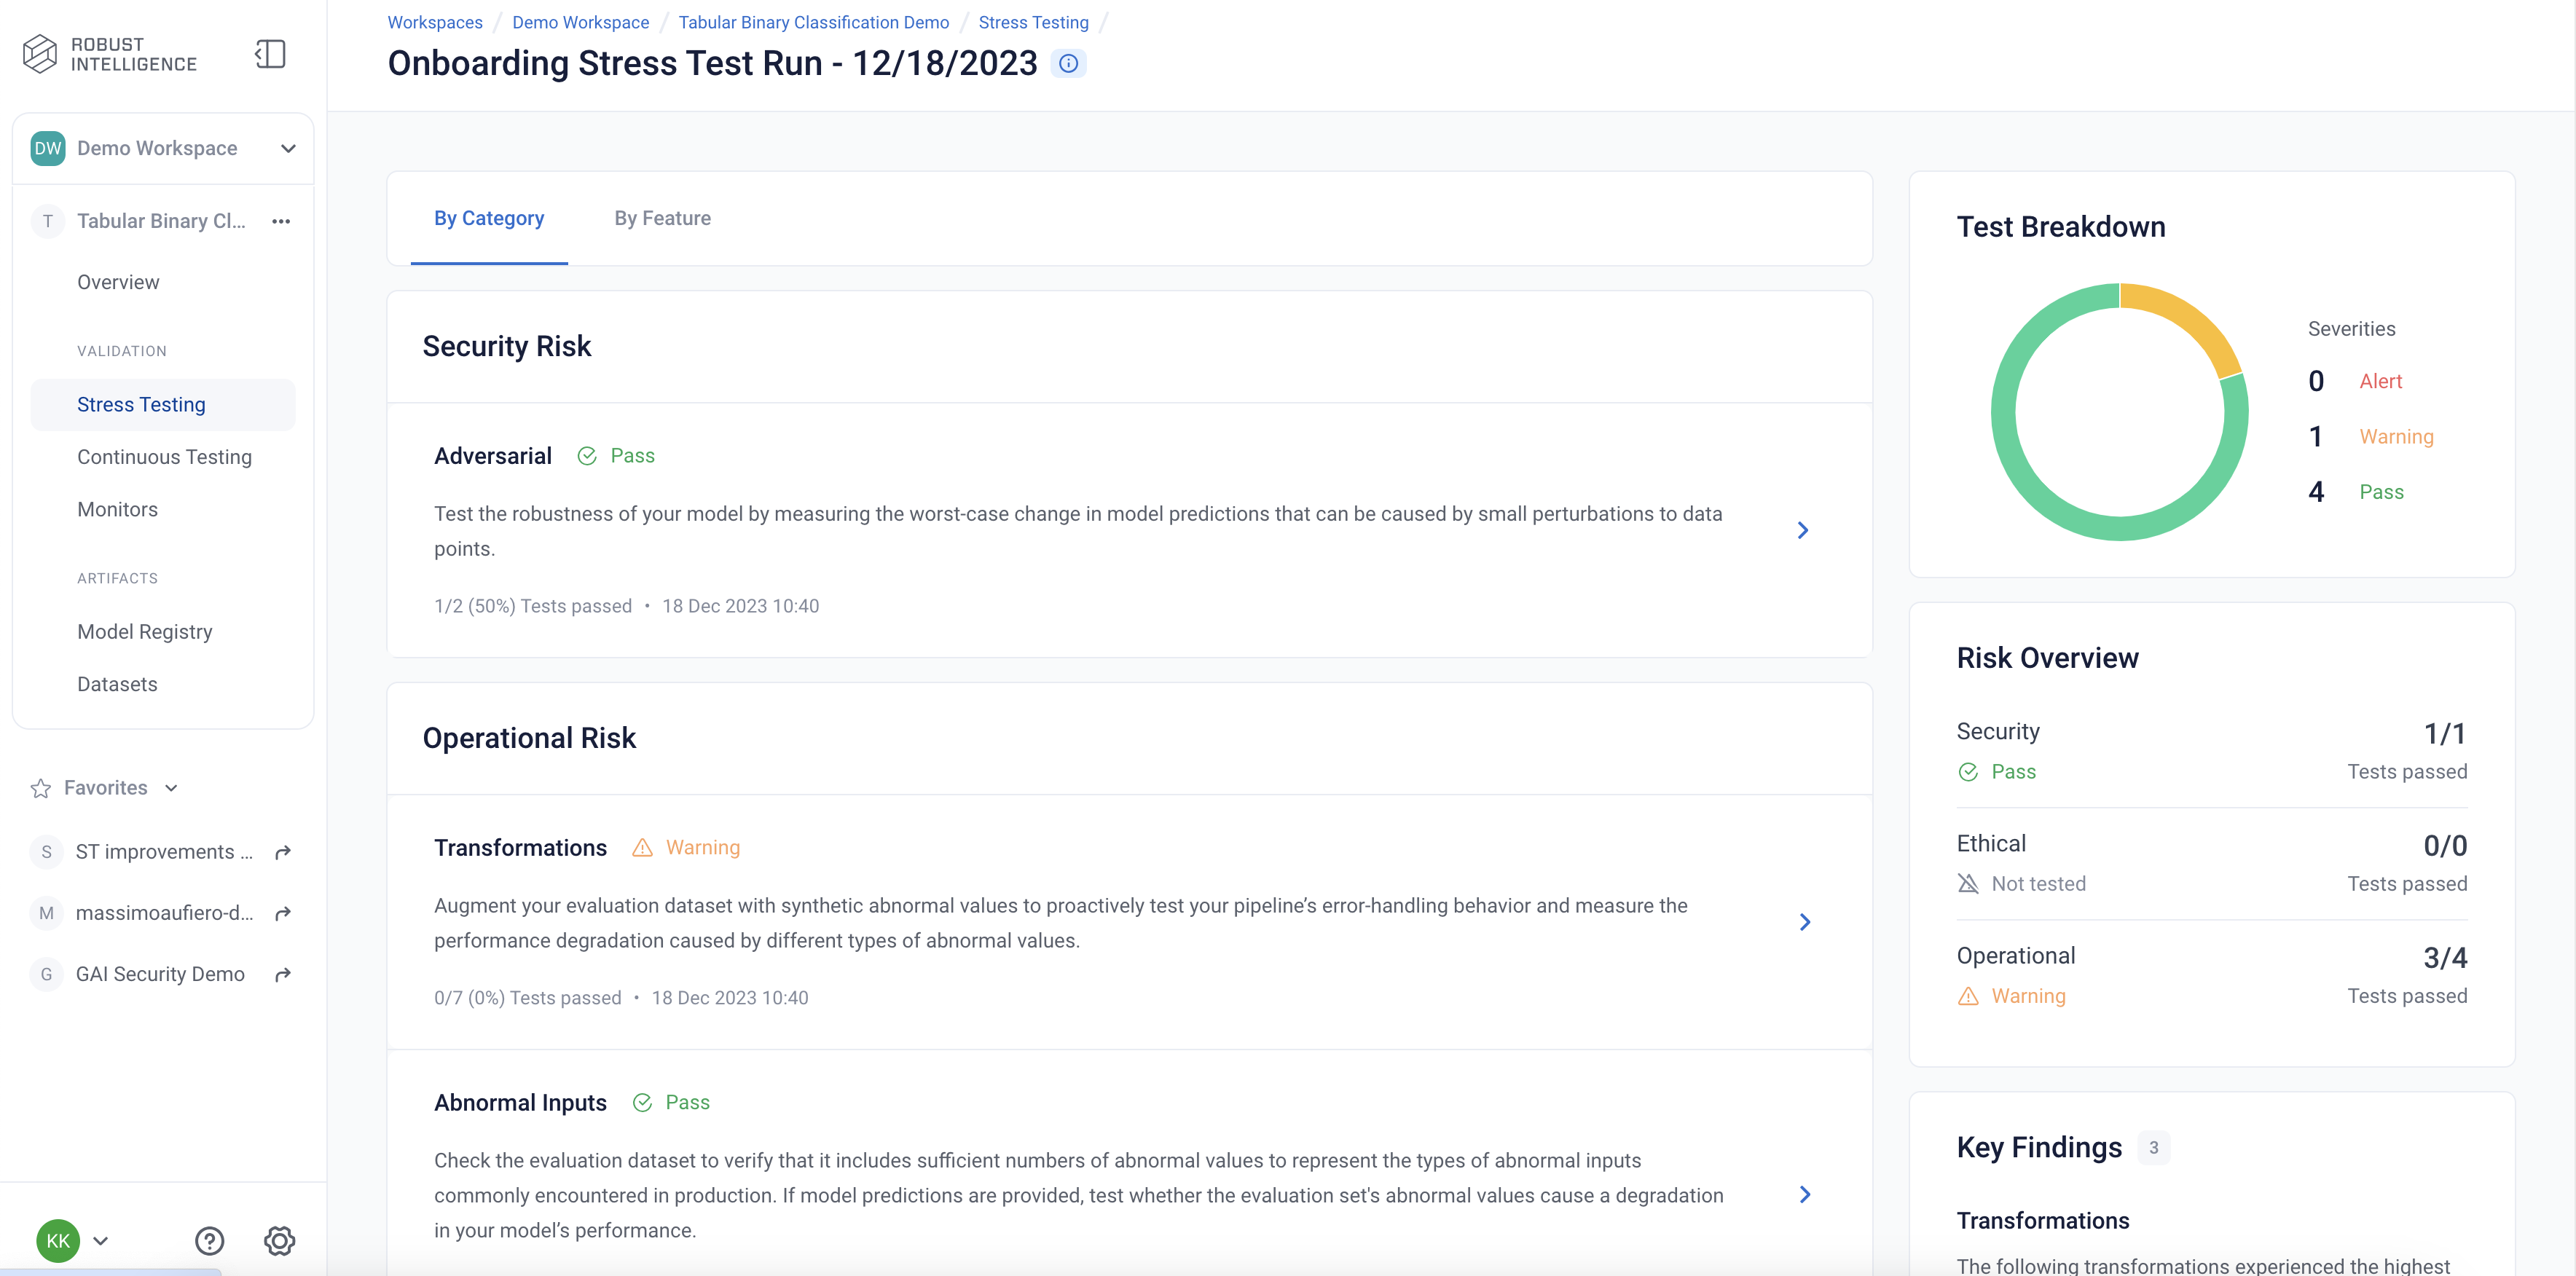
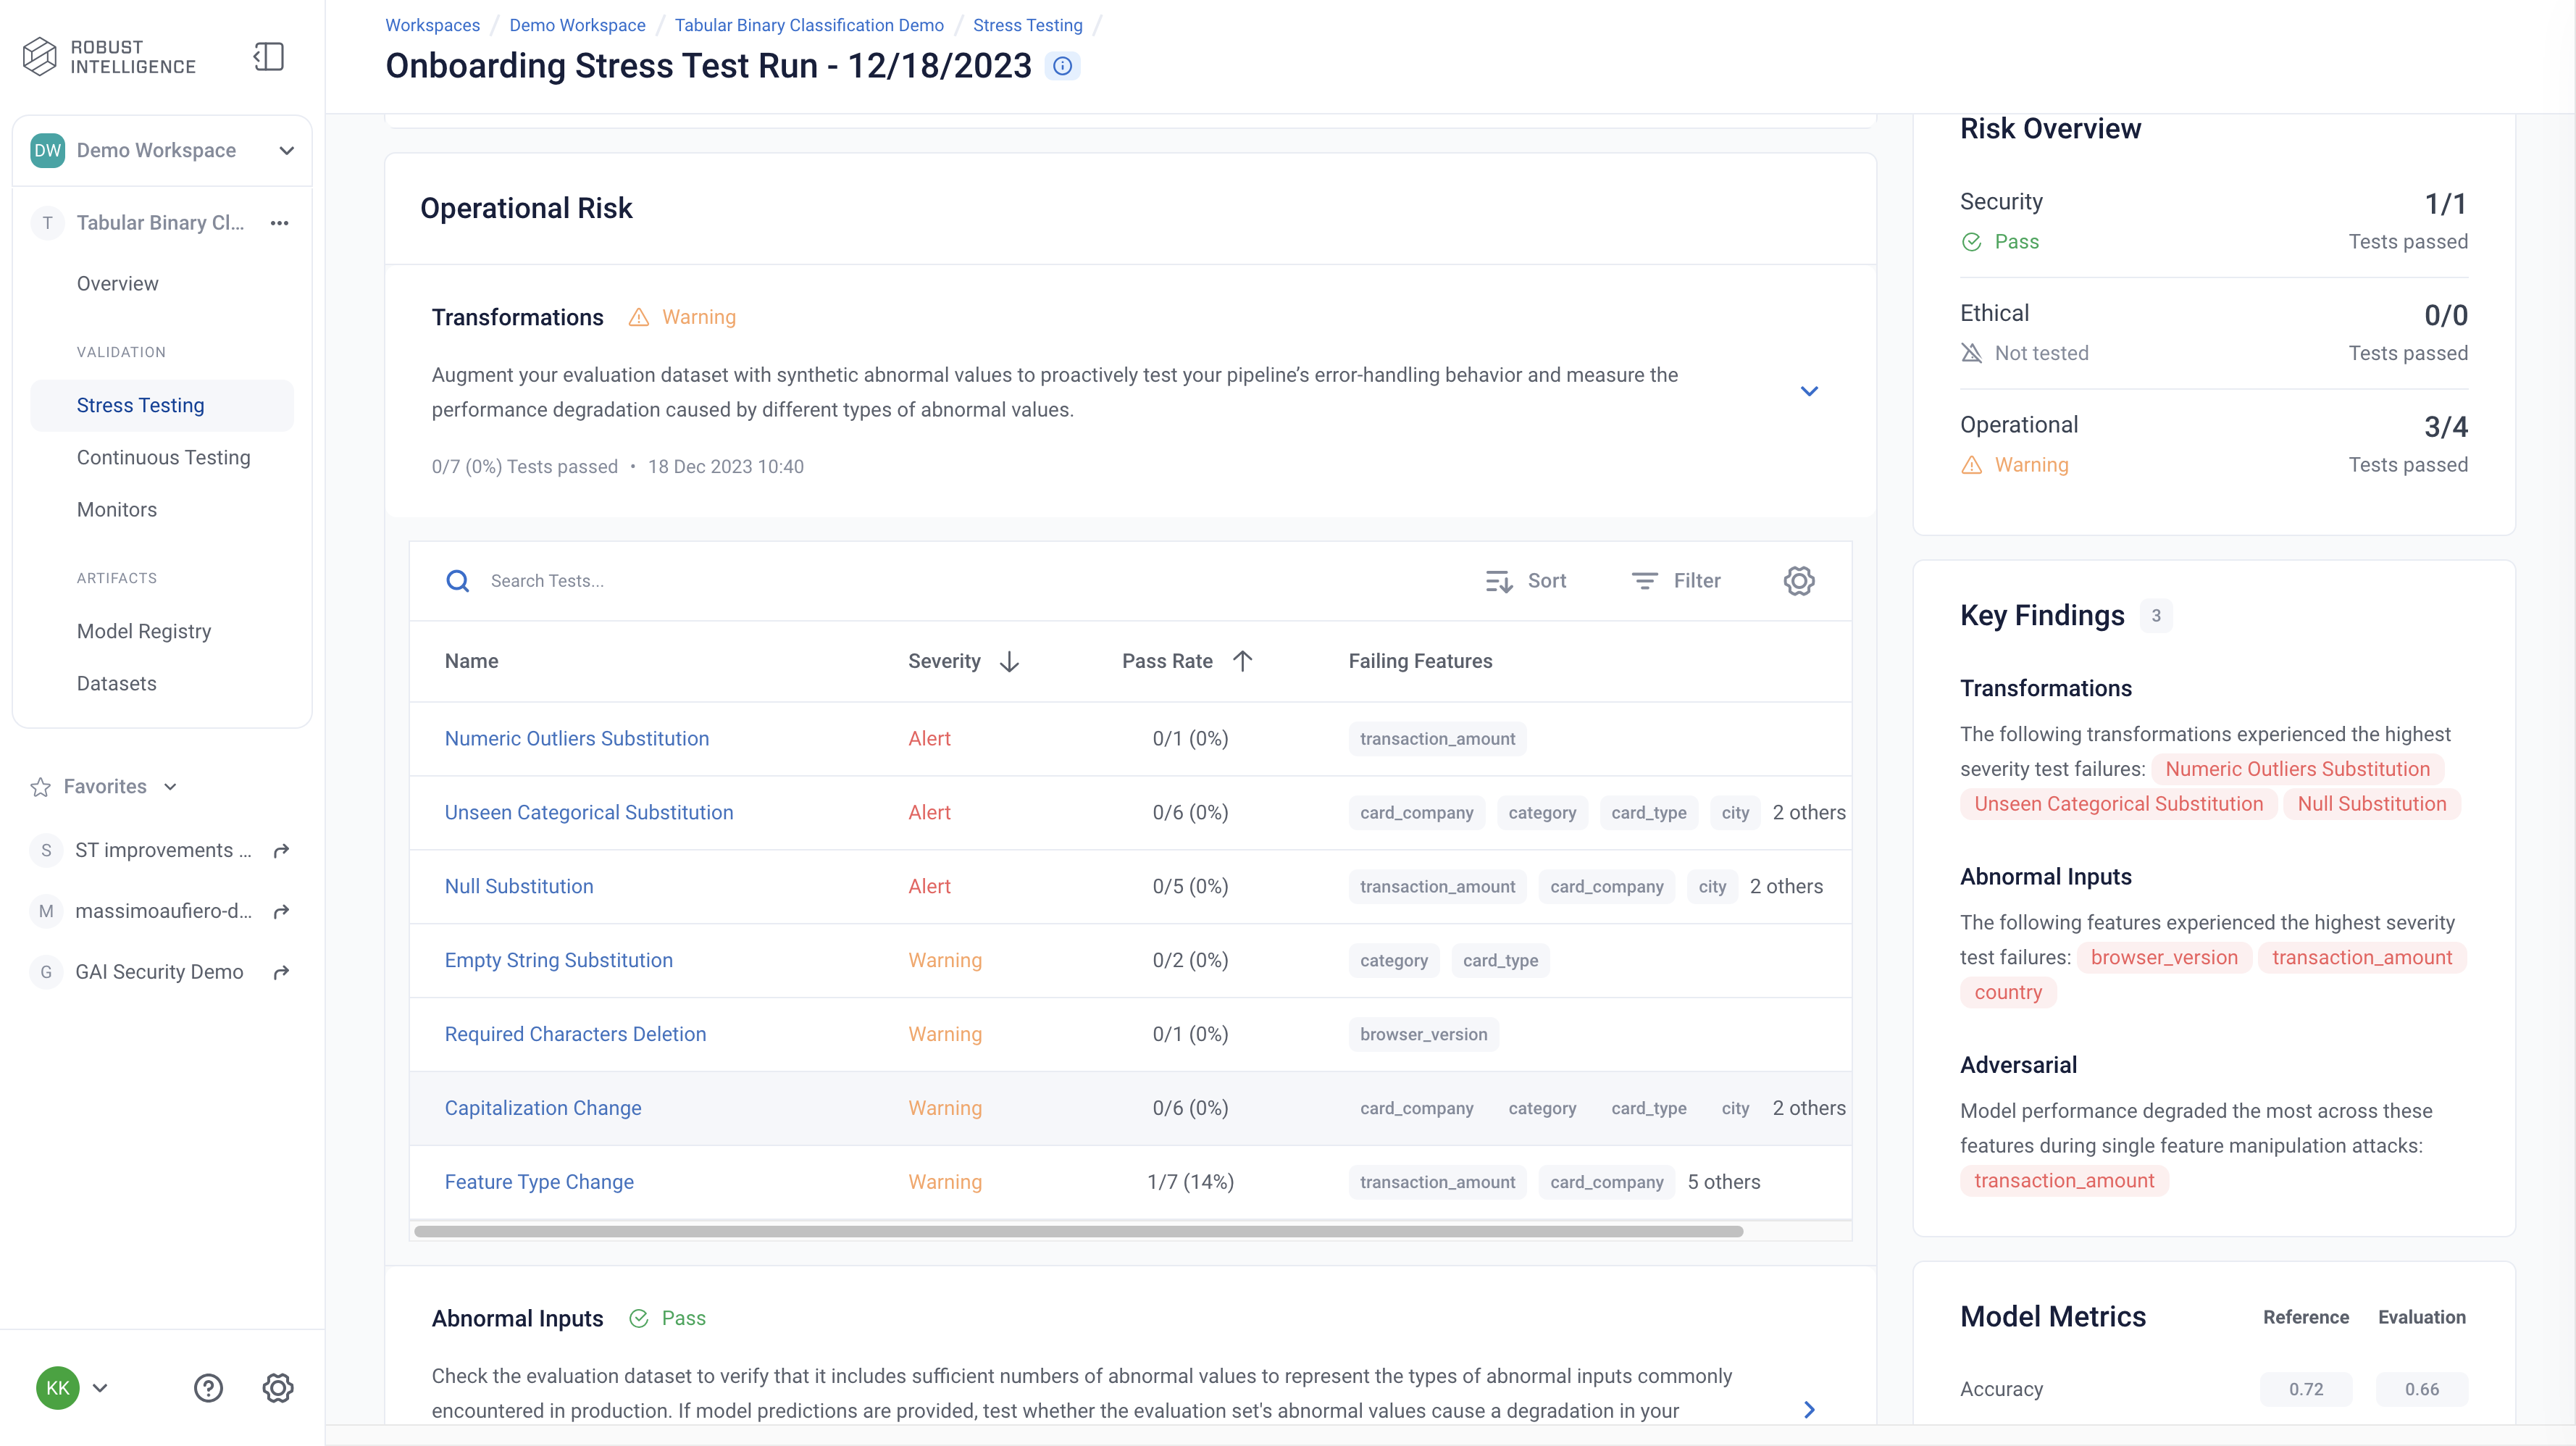
Stress Test Results
Stress tests are grouped first by risk categories and then into categories that measure various aspects of model robustness (model behavior, distribution drift, abnormal input, transformations, adversarial attacks, data cleanliness). Key findings to improve your model are aggregated on the category level as well. Tests are ranked by default by a shared severity metric. Clicking on an individual test surfaces more detailed information.
You can view the detailed results in the UI by running the below cell and redirecting to the generated link. This page shows granular results for a given AI Stress Test run.
[ ]:
test_run = stress_job.get_test_run()
test_run
Analyzing the Results
Below you can see a snapshot of the results.
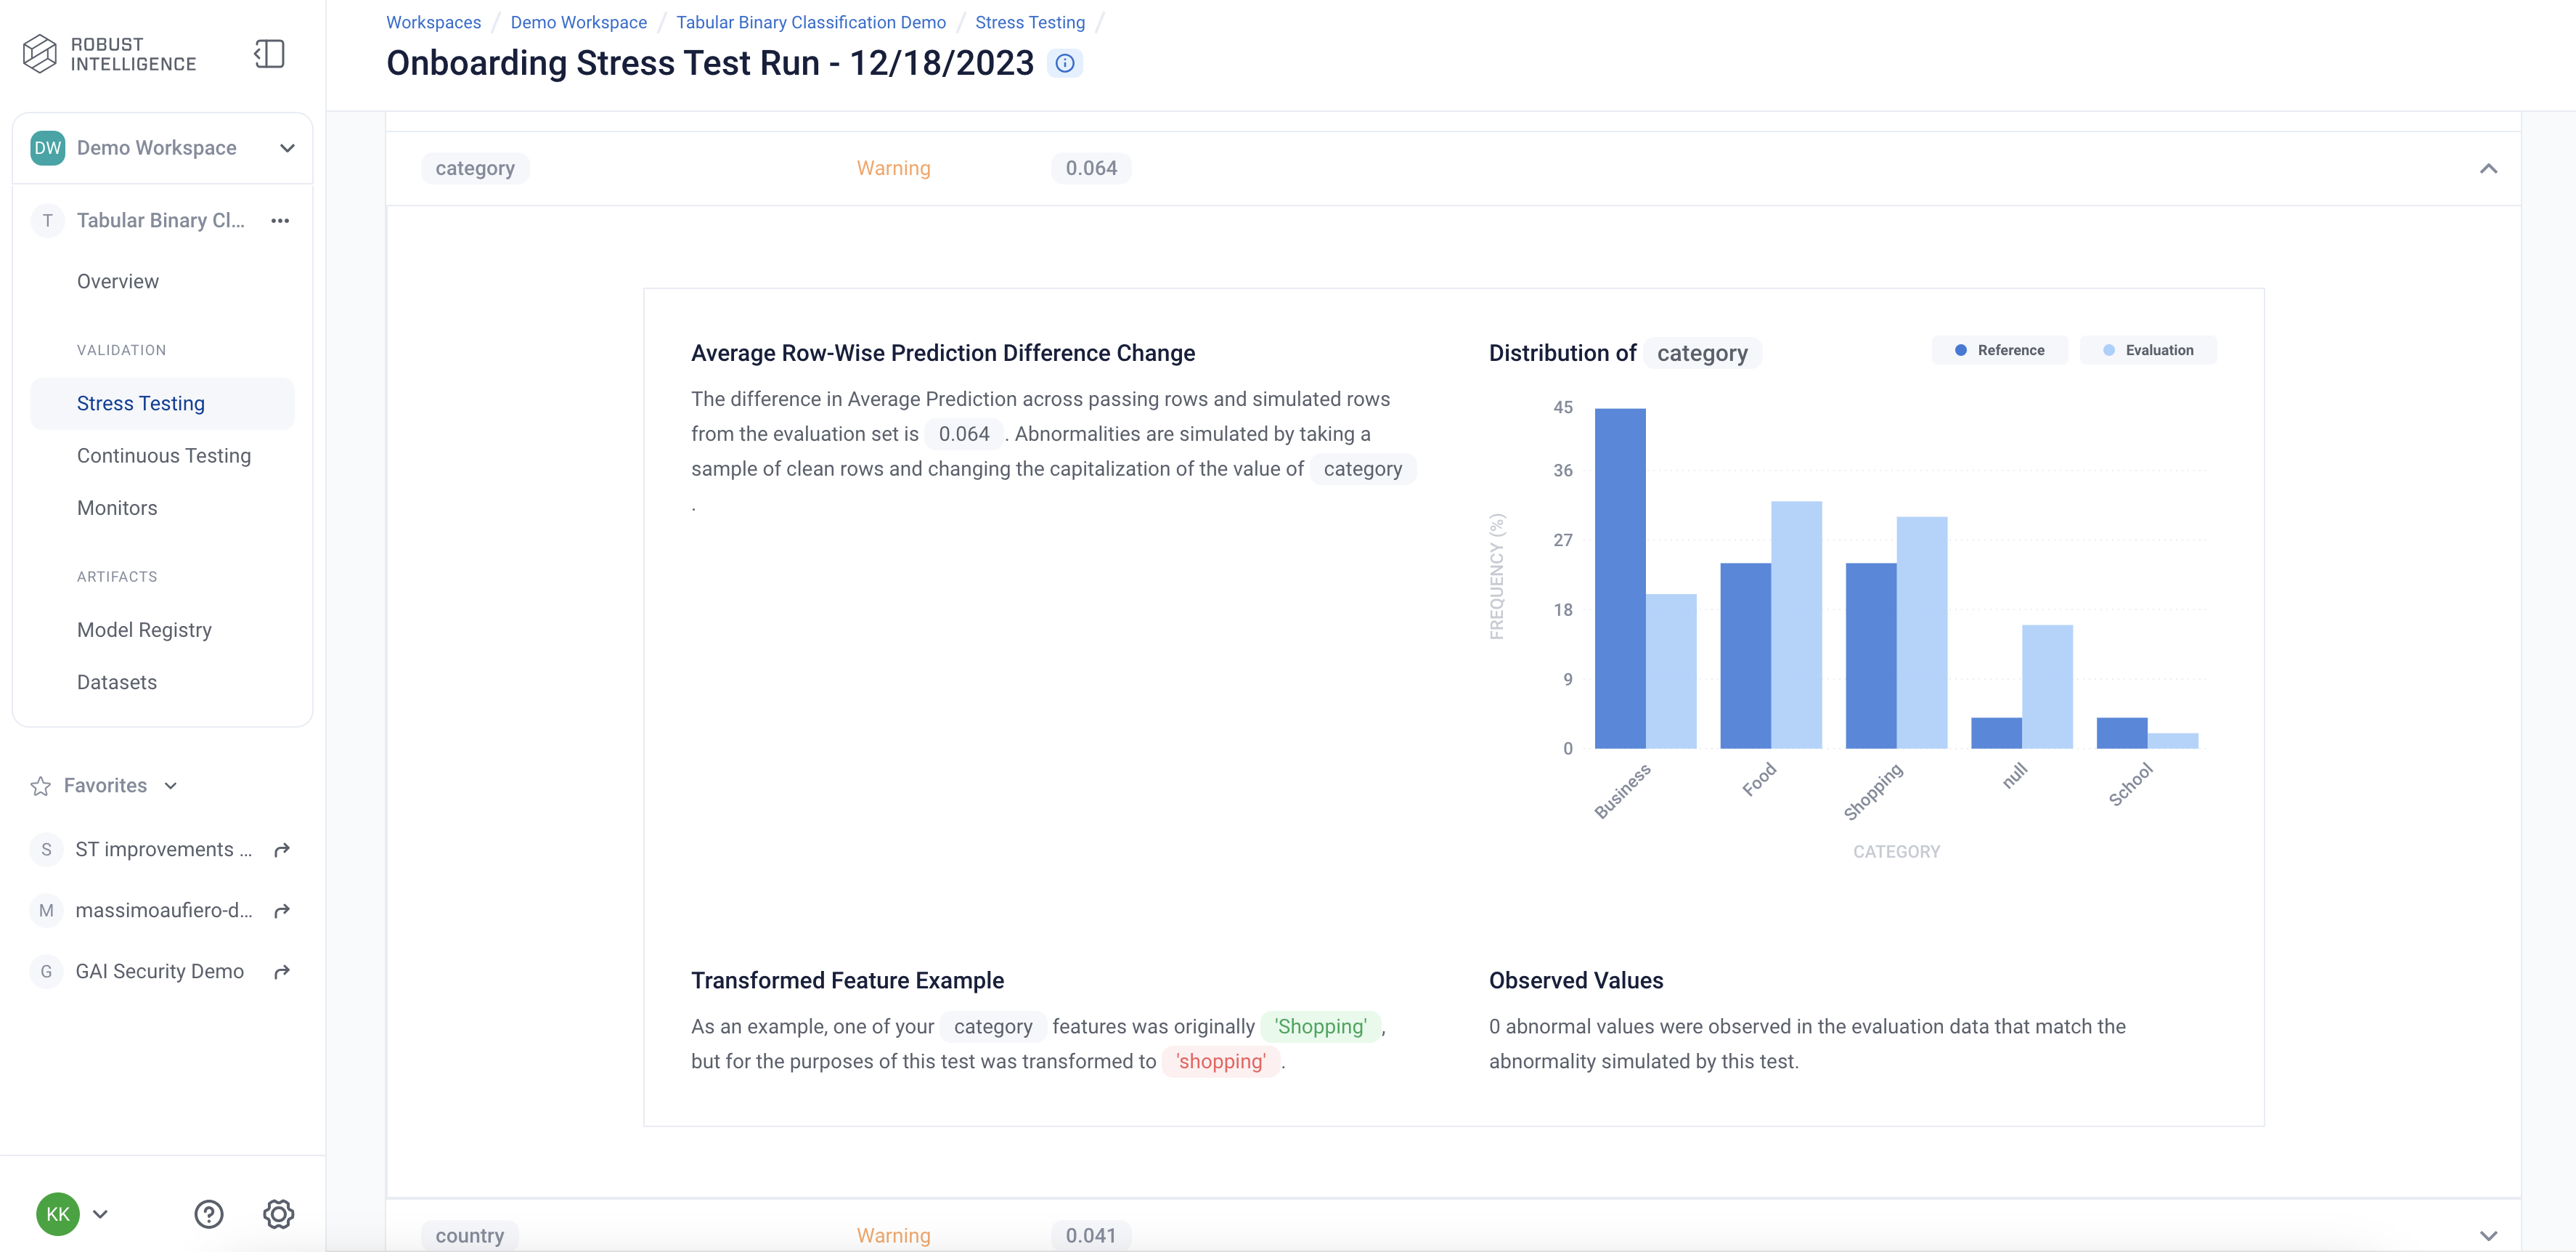
Here are the results of one of the Operational Risk tests, Transformations. Transformation tests augment evaluation dataset with abnormal values and measure the performance degradation from them.
Below we are exploring the “Capitalization Change” test cases for the feature “category”. This test measures the impact on the model when we substitute different types of capitalization into clean datapoints.
Programmatically Querying the Results
RIME not only provides you with an intuitive UI to visualize and explore these results, but also allows you to programmatically query these results. This allows customers to integrate with their MLOps pipeline, log results to experiment management tools like MLFlow, bring automated decision making to their ML practicies, or store these results for future references.
Run the below cell to programmatically query the results. The results are outputed as a pandas dataframe.
Access results at the a test run overview level
[ ]:
test_run_result = test_run.get_result_df()
test_run_result
Access detailed test results at each individual test cases level.
[ ]:
test_case_result = test_run.get_test_cases_df()
test_case_result.head()
Deploy to Production and set up Continuous Testing
Once you have identified the best stress test run, you can deploy the associated model and set up Continuous Testing in order to automatically detect “bad” incoming data and statistically significant distributional drift.
[ ]:
from datetime import timedelta

project.update_ct_categories(["TEST_CATEGORY_TYPE_ABNORMAL_INPUTS",
                              "TEST_CATEGORY_TYPE_DRIFT",
                              "TEST_CATEGORY_TYPE_EVASION_ATTACK_DETECTION"
                            ])

ct_instance = project.create_ct(model_id, ref_dataset_id, timedelta(days=1))
Uploading a Batch of Production Data & Model Predictions to Continuous Testing
The fraud detection model has been in production for 30 days. Production data and model predictions have been collected and stored for the past 30 days. Now, we will use Continuous Testing to track how the model performed across the last 30 days.
Upload the Latest Batch of Production Data
[ ]:
dt = str(datetime.now())
prod_s3_path = client.upload_file(
    Path('fraud/data/fraud_incremental.csv'),
    upload_path=upload_path
)
prod_dataset_id = project.register_dataset_from_file(
    f"prod_dataset_{dt}",
    prod_s3_path,
    data_params={"label_col": "label", "timestamp_col": "timestamp"},
    agent_id=AGENT_ID
)
prod_preds_s3_path = client.upload_file(
    Path('fraud/data/fraud_incremental_preds.csv'),
    upload_path=upload_path
)
project.register_predictions_from_file(
    prod_dataset_id, model_id, prod_preds_s3_path, agent_id=AGENT_ID
)
Run Continuous Testing over Batch of Data
[ ]:
ct_job = ct_instance.start_continuous_test(prod_dataset_id, agent_id=AGENT_ID)
ct_job.get_status(verbose=True, wait_until_finish=True)
ct_instance
Wait for a couple minutes and your results will appear in the UI.
Querying Results from Continuous Testing
After continuous testing has been created and data has been uploaded for processing, the user can query the results throughout the entire uploaded history.
Obtain All Detection Events
[ ]:
events = [d.to_dict() for m in ct_instance.list_monitors() for d in m.list_detected_events()]
events_df = pd.DataFrame(events).drop(["id", "project_id", "firewall_id", "event_object_id", "description_html", "last_update_time"], axis=1)
events_df.head()
CT Overview
The Overview page is the mission control for your model’s production deployment health. In it, you can see the status of continuous test runs and their metrics change over time.
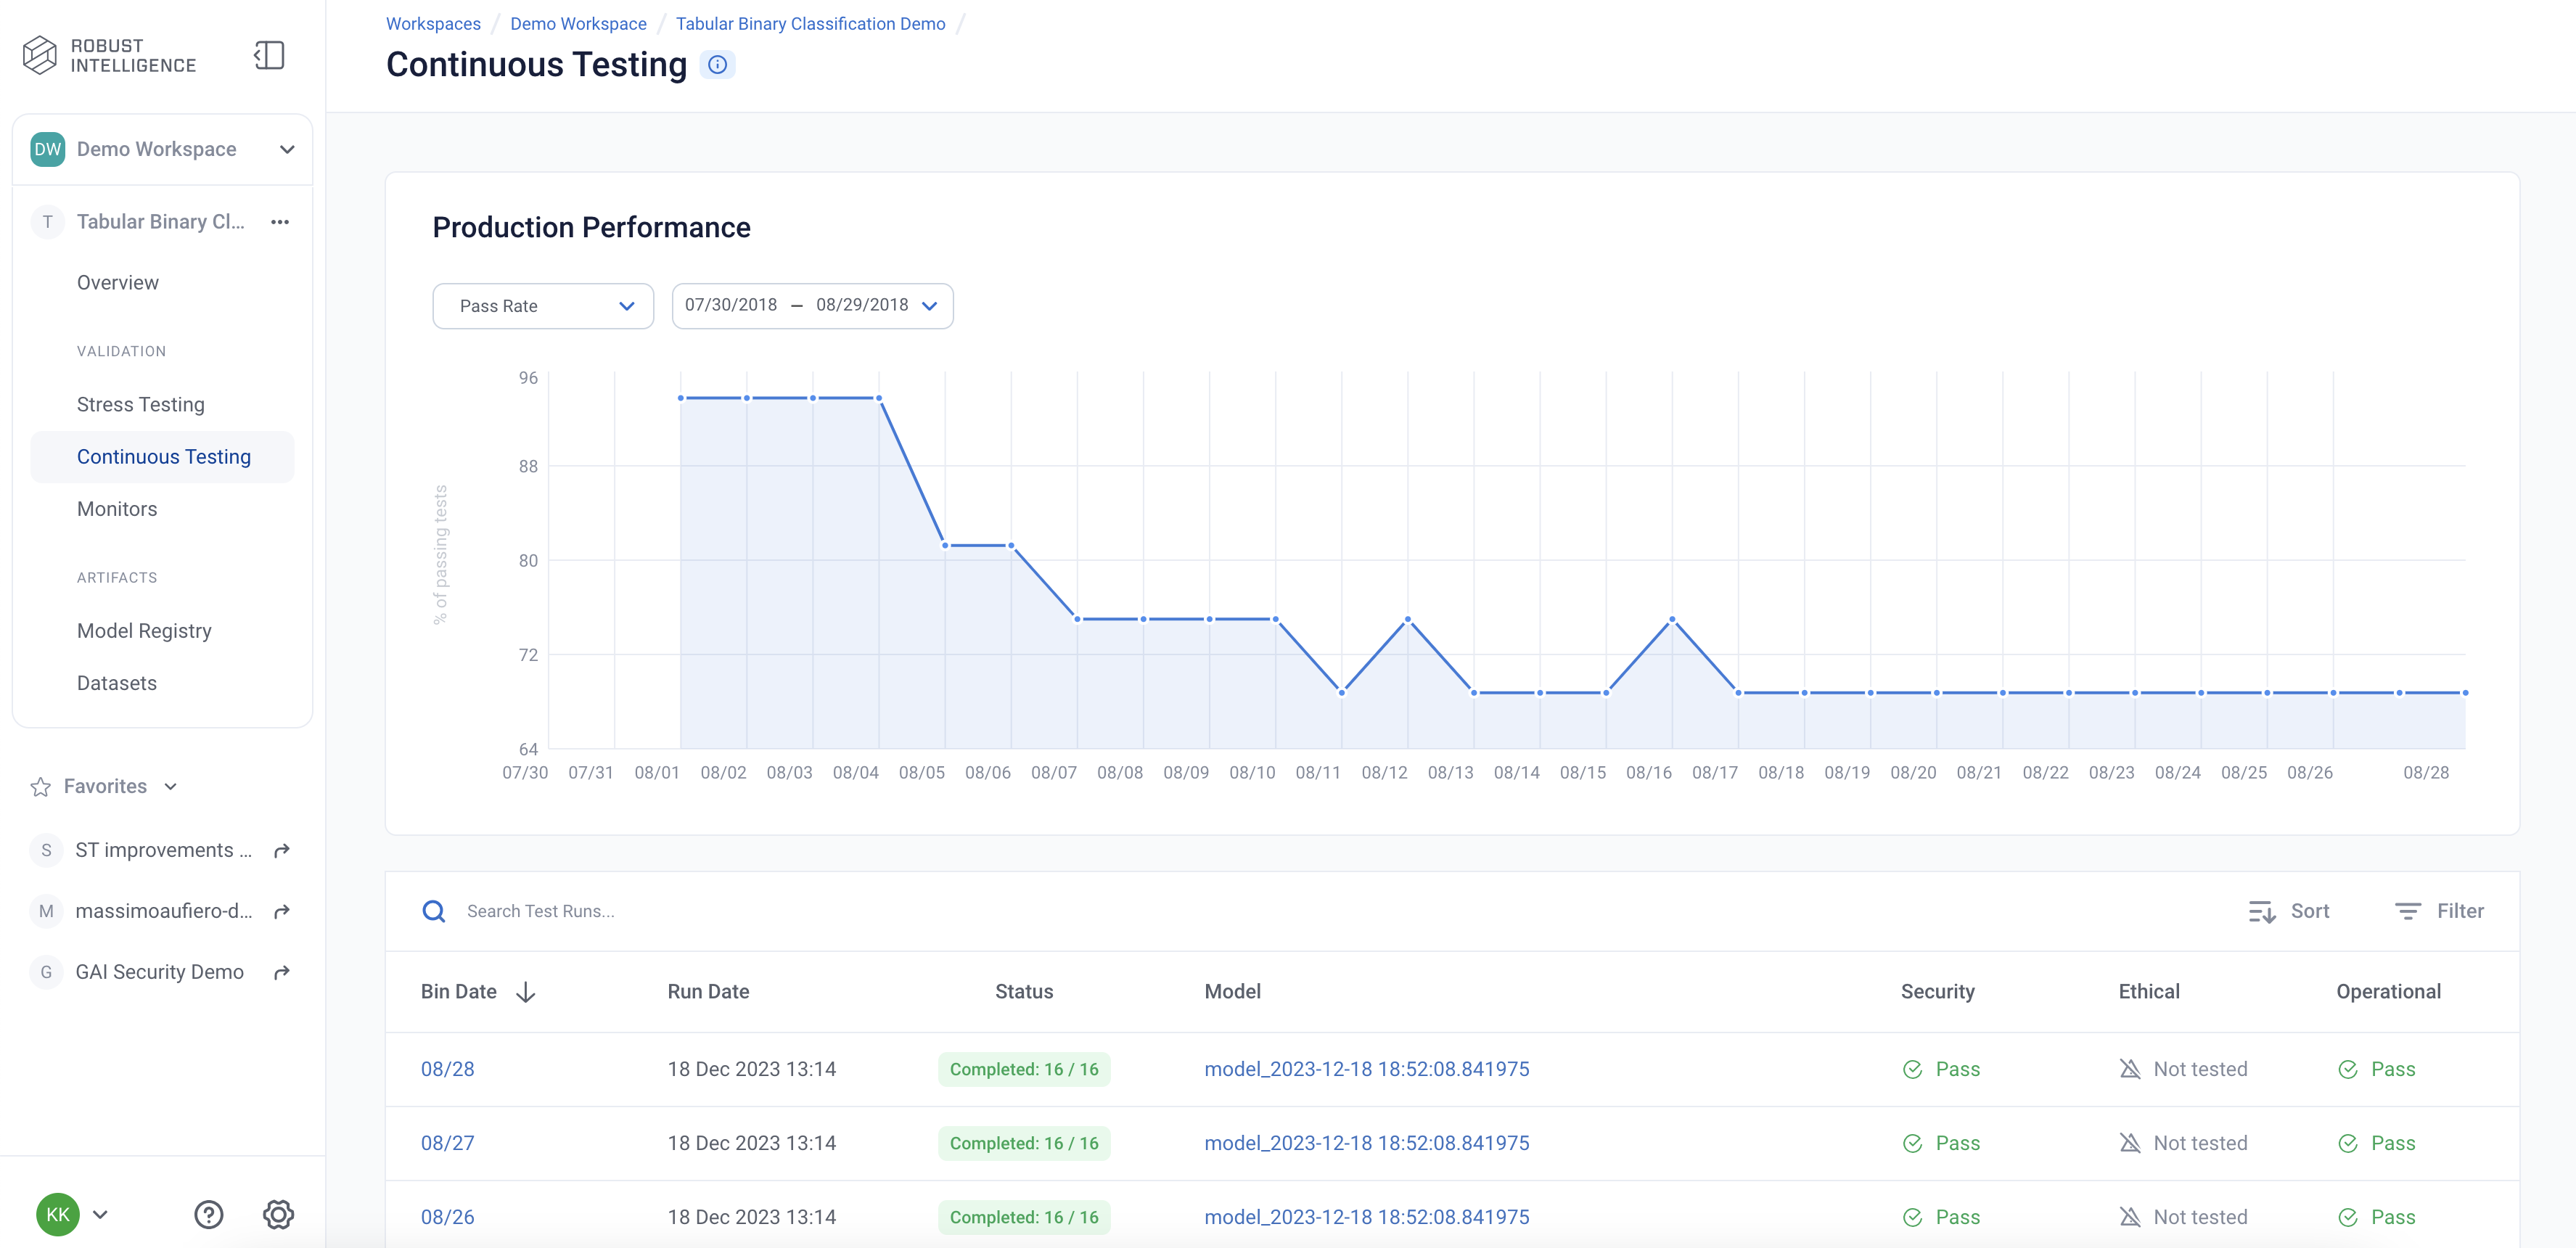
CT Results
The Continuous Tests operate at the batch level and provide a mechanism to monitor the health of ML deployments in production. They allow the user to understand when errors begin to occur and surface the underlying drivers of such errors.
You can explore the results in the UI by running the below cell and redirecting to the generated link.
[ ]:
ct_instance
Appendix
Uploading a Model to RIME
To be able to run certain tests, RIME needs query access to your model. To give RIME access, you’ll need to write a Python file that implements the predict_df(df: pd.DataFrame) -> np.ndarray function, and upload that file (and any objects that it loads) to the platform. Here we provide an example model file, show you how to upload this file and the relevant model artifacts, and show you how to configure stress tests to use this model.
[ ]:
%%writefile fraud/models/fraud_model.py
from pathlib import Path

from catboost import CatBoostClassifier
import numpy as np
import pandas as pd


mod = CatBoostClassifier()
# Load our CatBoost model. Note that this requires us to
# upload fraud_model.catb along with this Python file,
# in the same directory.
mod.load_model(Path(__file__).parent / "fraud_model.catb")
cat_cols = [
    'category',
    'card_type',
    'card_company',
    'city',
    'browser_version',
    'country',
]

def predict_df(df: pd.DataFrame) -> np.ndarray:
    """Given data as a pandas DataFrame, return probabilities as a NumPy array."""
    for col in cat_cols:
        df[col] = df[col].astype(object)
    # For binary classification we expect a one-dimensional
    # array for the probabilities, where the score for each datapoint
    # is the probability that the label is 1.
    return mod.predict_proba(df.fillna(0))[:,1]
[ ]:
# Note that 'fraud/models' directory already contains the 'fraud_model.catb' file.
appendix_model_dir = client.upload_directory(
    Path('fraud/models'), upload_path=upload_path
)
appendix_model_path = appendix_model_dir + "/fraud_model.py"
appendix_model_id = project.register_model_from_path(
    f"appendix_model_{dt}", appendix_model_path
)
stress_test_with_model_config = {
    "run_name": "Uploaded Model Example",
    "data_info": {
        "ref_dataset_id": ref_dataset_id,
        "eval_dataset_id": eval_dataset_id,
    },
    "model_id": appendix_model_id
}
stress_job = client.start_stress_test(
    stress_test_with_model_config, project.project_id, agent_id=AGENT_ID
)
stress_job.get_status(verbose=True, wait_until_finish=True)
Running a Custom Test
With RIME you can write your own custom tests, to encode any domain-specific validation you want to perform. These tests will run and be uploaded to the platform just like any of the built-in tests. To run a custom test you need to implement a specific interface in Python, upload the file to the platform, and point to it in your configuration. Below we provide a simple example of a custom test that checks if the difference in the length of the reference and evaluation datasets does not exceed some threshold.
[ ]:
%%writefile fraud/custom_test.py
"""Custom test batch runner."""
from typing import List, Tuple
from rime.core.schema.config import CustomConfig
from rime.protos.ri.api.resultsynthesizer.result_message_pb2 import (
    TestCaseStatus as Status,
)
from rime.core.stress_tests.schema.table_info import TableColumn
from rime.core.stress_tests.schema.test_result import TestBatchResult, TestOutput
from rime.core.test import BaseTest, TestExtraInfo
from rime.core.stress_tests.batch_runner import DataTestBatchRunner
from rime.core.stress_tests.schema.test_result import TestBatchResult, TestOutput
from rime.core.profiler.run_containers import RunContainer
from rime.protos.ri.lib.common_pb2 import Severity

# Signature should not be changed.
class CustomTest(BaseTest):
    def __init__(self, delta: int = 0):
        """Initialize with a delta between n_rows ref and eval."""
        super().__init__()
        self.delta = delta

    # Signature should not be changed.
    def run(
        self,
        run_container: RunContainer,
        silent_errors: bool = False
    ) -> Tuple[TestOutput, TestExtraInfo]:
        ref_data_size = len(run_container.ref_data.df)
        eval_data_size = len(run_container.eval_data.df)
        if ref_data_size > eval_data_size + self.delta:
            status = Status.TEST_CASE_STATUS_WARNING
            severity = Severity.SEVERITY_ALERT
        else:
            status = Status.TEST_CASE_STATUS_PASS_UNSPECIFIED
            severity = Severity.SEVERITY_PASS
        test_output = TestOutput(
            self.id, status, {"Severity": severity}, severity, [],
        )
        return test_output, TestExtraInfo(severity)


# Signature should not be changed.
class CustomBatchRunner(DataTestBatchRunner):
    """TestBatchRunner for the CustomTest."""

    # Signature should not be changed.
    @classmethod
    def _from_config(
        cls, run_container: RunContainer,  config: CustomConfig, category: str
    ) -> "DataTestBatchRunner":
        if config.params is None:
            delta = 0
        else:
            delta = config.params["delta"]
        tests = [CustomTest(delta=delta)]
        return cls(tests, category)

    # Signature should not be changed.
    def _outputs_to_batch_res(
        self,
        run_container: RunContainer,
        outputs: List[TestOutput],
        extra_infos: List[dict],
        duration: float,
    ) -> TestBatchResult:
        long_description_tabs = [
            {"title": "Description", "contents": self.long_description},
            {"title": "Why it Matters", "contents": "Explain why this test matters."},
            {
                "title": "Configuration",
                "contents": "Explain how this test is configured."
            },
            {
                "title": "Example",
                "contents": "Include an example of how this test works."
            },
        ]
        return TestBatchResult(
            self.type,
            self.description,
            long_description_tabs,
            self.category,
            outputs,
            [],
            duration,
            extra_infos,
            [TableColumn("Severity")],
            outputs[0].severity,
        )


    # Signature should not be changed.
    @property
    def description(self) -> str:
        return "This is custom test"

    # Signature should not be changed.
    @property
    def long_description(self) -> str:
        return "This is a long description of a custom test."

    # Signature should not be changed.
    @property
    def type(self) -> str:
        return "Example Custom Test"
[ ]:
custom_test_path = client.upload_file("fraud/custom_test.py", upload_path=upload_path)
[ ]:
stress_test_with_model_config = {
    "run_name": "Custom Test Example",
    "data_info": {
        "ref_dataset_id": ref_dataset_id,
        "eval_dataset_id": eval_dataset_id,
    },
    "test_suite_config": {
        "custom_tests": [
            {
                "custom_test_category": "Data Cleanliness",
                "test_path": custom_test_path
            }
        ],
    },
    "model_id": model_id
}
stress_job = client.start_stress_test(
    stress_test_with_model_config, project.project_id, agent_id=AGENT_ID
)
stress_job.get_status(verbose=True, wait_until_finish=True)
[ ]:
stress_job.get_test_run()