RI Movie Ratings Ranking Data Walkthrough 🎥
▶️ Try this in Colab! Run the RI Movie Ratings Ranking Data Walkthrough in Google Colab.
In this walkthrough, you are a data scientist tasked with training a recommendation system to predict whether or not a given user will upvote a movie. From experience, the team has found that the upstream data pipelines can be brittle, and want to use RIME to:
Proactively test how vulnerable the model is to data failures during stress testing.
To continuously monitor and track broken inputs in production.
Install Dependencies, Import Libraries and Download Data
Run the cell below to install libraries to receive data, install our SDK, and load analysis libraries.
[ ]:
!pip install rime-sdk &> /dev/null

import pandas as pd
from pathlib import Path
from rime_sdk import Client
[ ]:
!pip install https://github.com/RobustIntelligence/ri-public-examples/archive/master.zip

from ri_public_examples.download_files import download_files

download_files('tabular-2.0/ranking', 'ranking')
Establish the RIME Client
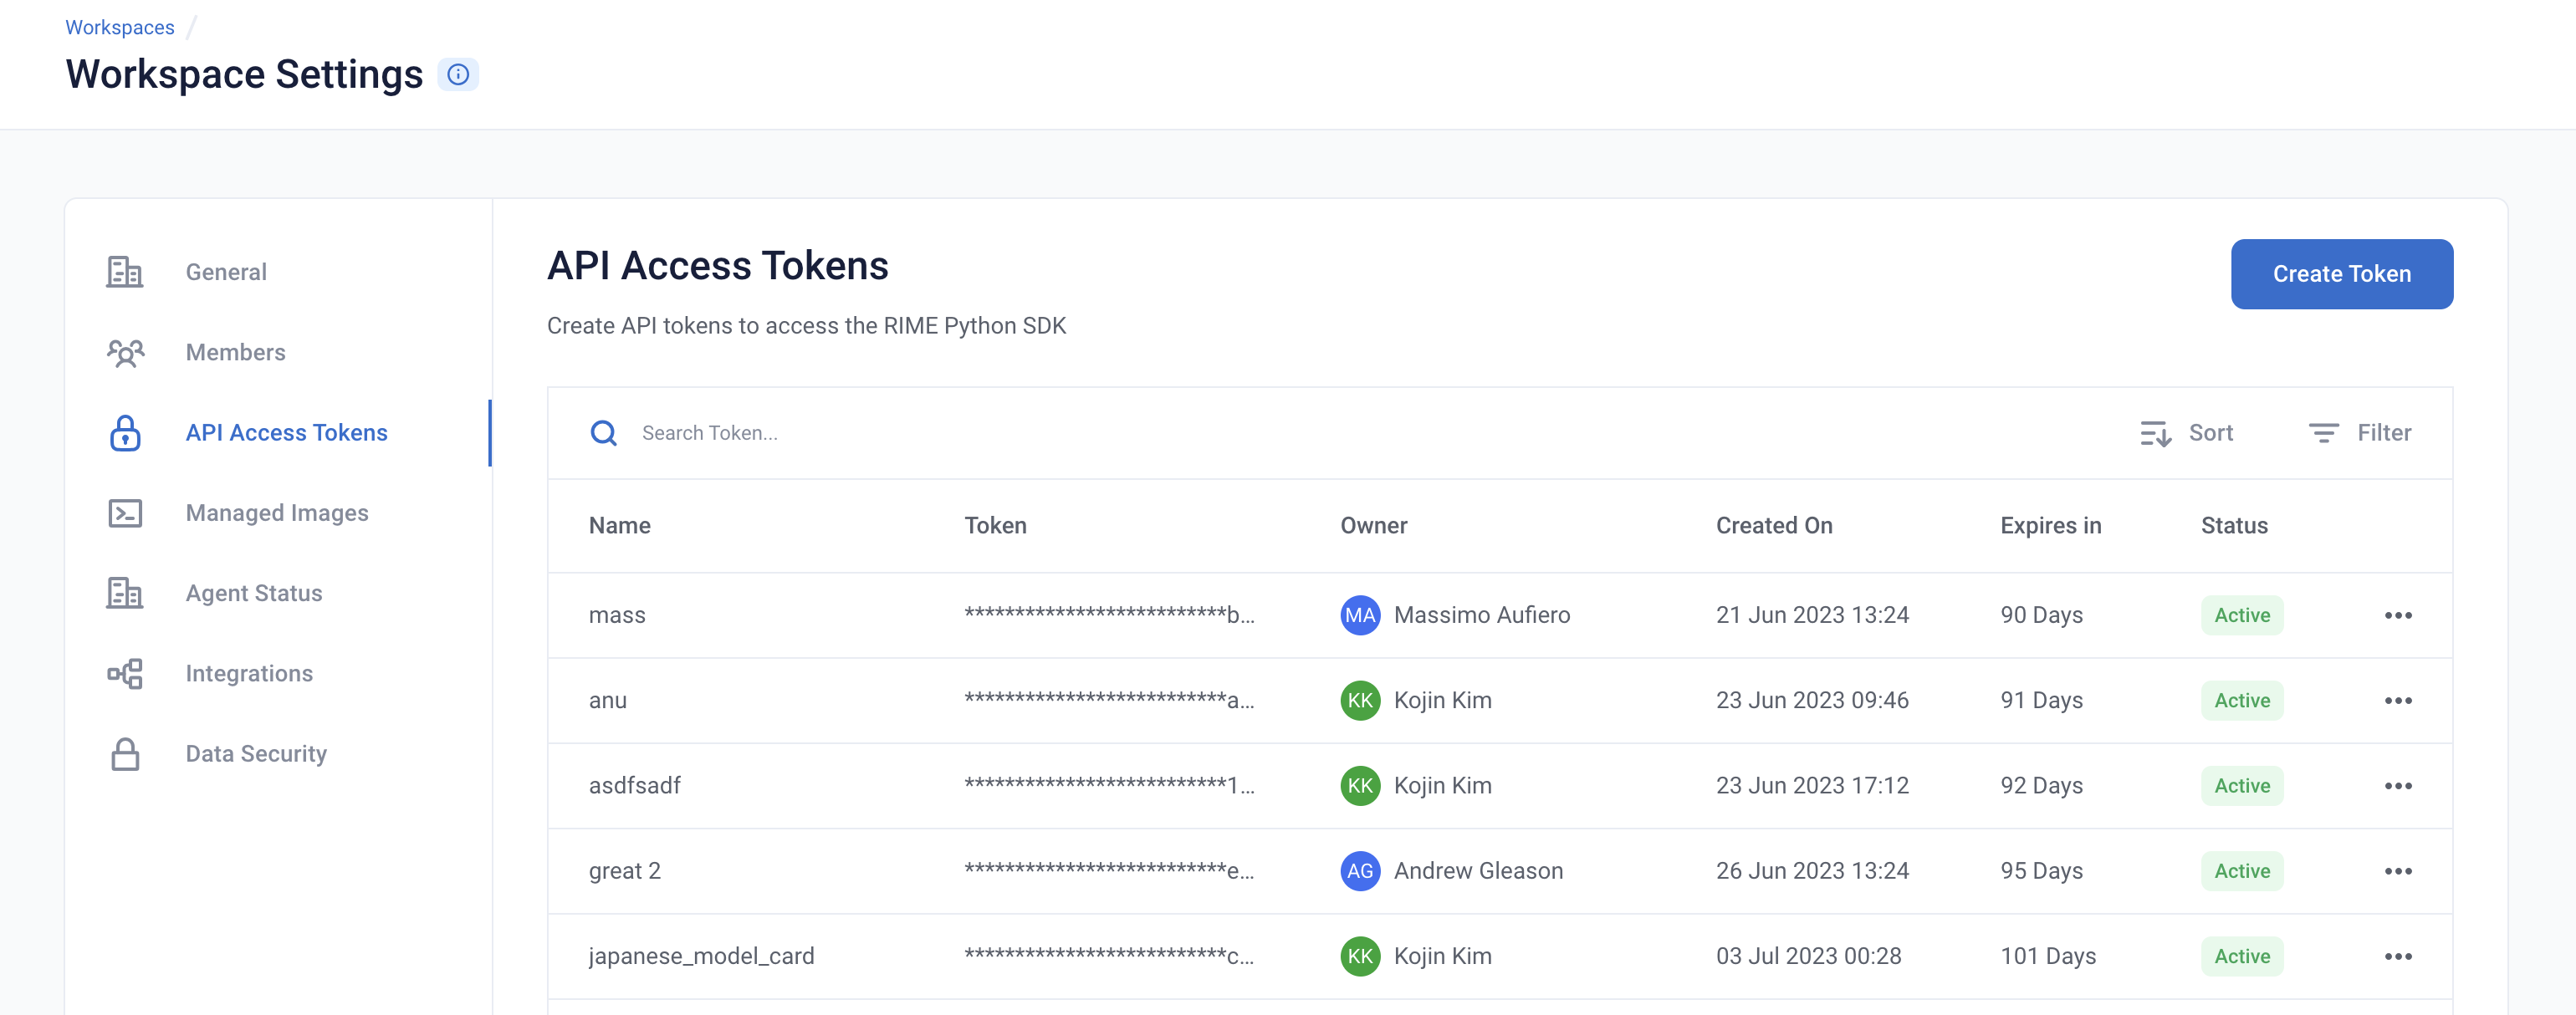
To get started, provide the API credentials and the base domain/address of the RIME service. You can generate and copy an API token from the API Access Tokens Page under Workspace settings. For the domian/address of the RIME service, contact your admin.

[ ]:
API_TOKEN = '' # PASTE API_KEY
CLUSTER_URL = '' # PASTE DEDICATED DOMAIN OF RIME SERVICE (e.g., https://rime.example.rbst.io)
AGENT_ID = '' # PASTE AGENT_ID IF USING AN AGENT THAT IS NOT THE DEFAULT
client = Client(CLUSTER_URL, API_TOKEN)
Create a New Project
You can create projects in RIME to organize your test runs. Each project represents a workspace for a given machine learning task. It can contain multiple candidate models, but should only contain one promoted production model.
[ ]:
description = (
    "Run Stress Testing and AI Continuous Testing on a point-wise"
    " tabular ranking model and dataset. Demonstration uses a"
    " movie ranking dataset."
)
project = client.create_project(
    name='Tabular Ranking Demo',
    description=description,
    model_task='MODEL_TASK_RANKING'
)
Go back to the UI to see the new Ranking Demo Project.
Preparing the Model + Datasets
Next, let’s take a quick look at the training data (in this case, this was the data used to train the model):
[ ]:
df = pd.read_csv(Path('ranking/data/ref.csv'))
df.head()
Uploading Artifacts to Blob Storage
For SaaS environments using the default S3 storage location, the Python SDK supports direct file uploads using upload_*().
For other environments and storage technologies, artifacts must be managed through alternate means.
[ ]:
IS_SAAS = False # TOGGLE True/False (Note: SaaS environments use URLs ending in "rbst.io" and have an "Internal Agent")
[ ]:
if not IS_SAAS:
    BLOB_STORE_URI = "" # PROVIDE BLOB STORE URI (e.g., "s3://acmecorp-rime")
    assert BLOB_STORE_URI != ""

UPLOAD_PATH = "ri_public_examples_ranking"
[ ]:
if IS_SAAS:
    model_s3_dir = client.upload_directory(
        Path('ranking/models'), upload_path=UPLOAD_PATH
    )
    model_s3_path = model_s3_dir + "/model_extras/model.py"

    ref_s3_path = client.upload_file(
        Path('ranking/data/ref.csv'), upload_path=UPLOAD_PATH
    )
    eval_s3_path = client.upload_file(
        Path('ranking/data/eval.csv'), upload_path=UPLOAD_PATH
    )

    ref_preds_s3_path = client.upload_file(
        Path("ranking/data/ref_preds.csv"), upload_path=UPLOAD_PATH
    )
    eval_preds_s3_path = client.upload_file(
        Path("ranking/data/eval_preds.csv"), upload_path=UPLOAD_PATH
    )
else:
    model_s3_path = f"{BLOB_STORE_URI}/{UPLOAD_PATH}/model_extras/model.py"

    ref_s3_path = f"{BLOB_STORE_URI}/{UPLOAD_PATH}/data/ref.csv"
    eval_s3_path = f"{BLOB_STORE_URI}/{UPLOAD_PATH}/data/eval.csv"

    ref_preds_s3_path = f"{BLOB_STORE_URI}/{UPLOAD_PATH}/data/ref_preds.csv"
    eval_preds_s3_path = f"{BLOB_STORE_URI}/{UPLOAD_PATH}/data/eval_preds.csv"
Once the data and model are uploaded to S3, we can register them to RIME. Once they’re registered, we can refer to these resources using their RIME-generated ID’s.
[ ]:
from datetime import datetime

dt = str(datetime.now())

# Note: models and datasets need to have unique names.
model_id = project.register_model_from_path(f"model_{dt}", model_s3_path, agent_id=AGENT_ID)

data_params = {
    "label_col": "rank_label",
    "ranking_info": {
      "query_col": "query_id"
    },
    "protected_features": ["Director", "Cast1"],
}
ref_dataset_id = project.register_dataset_from_file(
    f"ref_dataset_{dt}", ref_s3_path, data_params=data_params, agent_id=AGENT_ID
)
eval_dataset_id = project.register_dataset_from_file(
    f"eval_dataset_{dt}", eval_s3_path, data_params=data_params, agent_id=AGENT_ID
)
pred_params = {"pred_col": "pred"}
project.register_predictions_from_file(
    ref_dataset_id, model_id, ref_preds_s3_path, pred_params=pred_params, agent_id=AGENT_ID
)
project.register_predictions_from_file(
    eval_dataset_id, model_id, eval_preds_s3_path, pred_params=pred_params, agent_id=AGENT_ID
)
Running a Stress Test
AI Stress Tests allow you to test your data and model before deployment. They are a comprehensive suite of hundreds of tests that automatically identify implicit assumptions and weaknesses of pre-production models. Each stress test is run on a single model and its associated reference and evaluation datasets.
Below is a sample configuration of how to setup and run a RIME Stress Test.
[ ]:
stress_test_config = {
    "run_name": "Movie Ranking",
    "data_info": {
        "ref_dataset_id": ref_dataset_id,
        "eval_dataset_id": eval_dataset_id,
    },
    "model_id": model_id,
    "categories": ["TEST_CATEGORY_TYPE_ADVERSARIAL", "TEST_CATEGORY_TYPE_SUBSET_PERFORMANCE", "TEST_CATEGORY_TYPE_TRANSFORMATIONS", "TEST_CATEGORY_TYPE_BIAS_AND_FAIRNESS"]
}
stress_job = client.start_stress_test(
    stress_test_config, project.project_id, agent_id=AGENT_ID
)
stress_job.get_status(verbose=True, wait_until_finish=True)
Stress Test Results
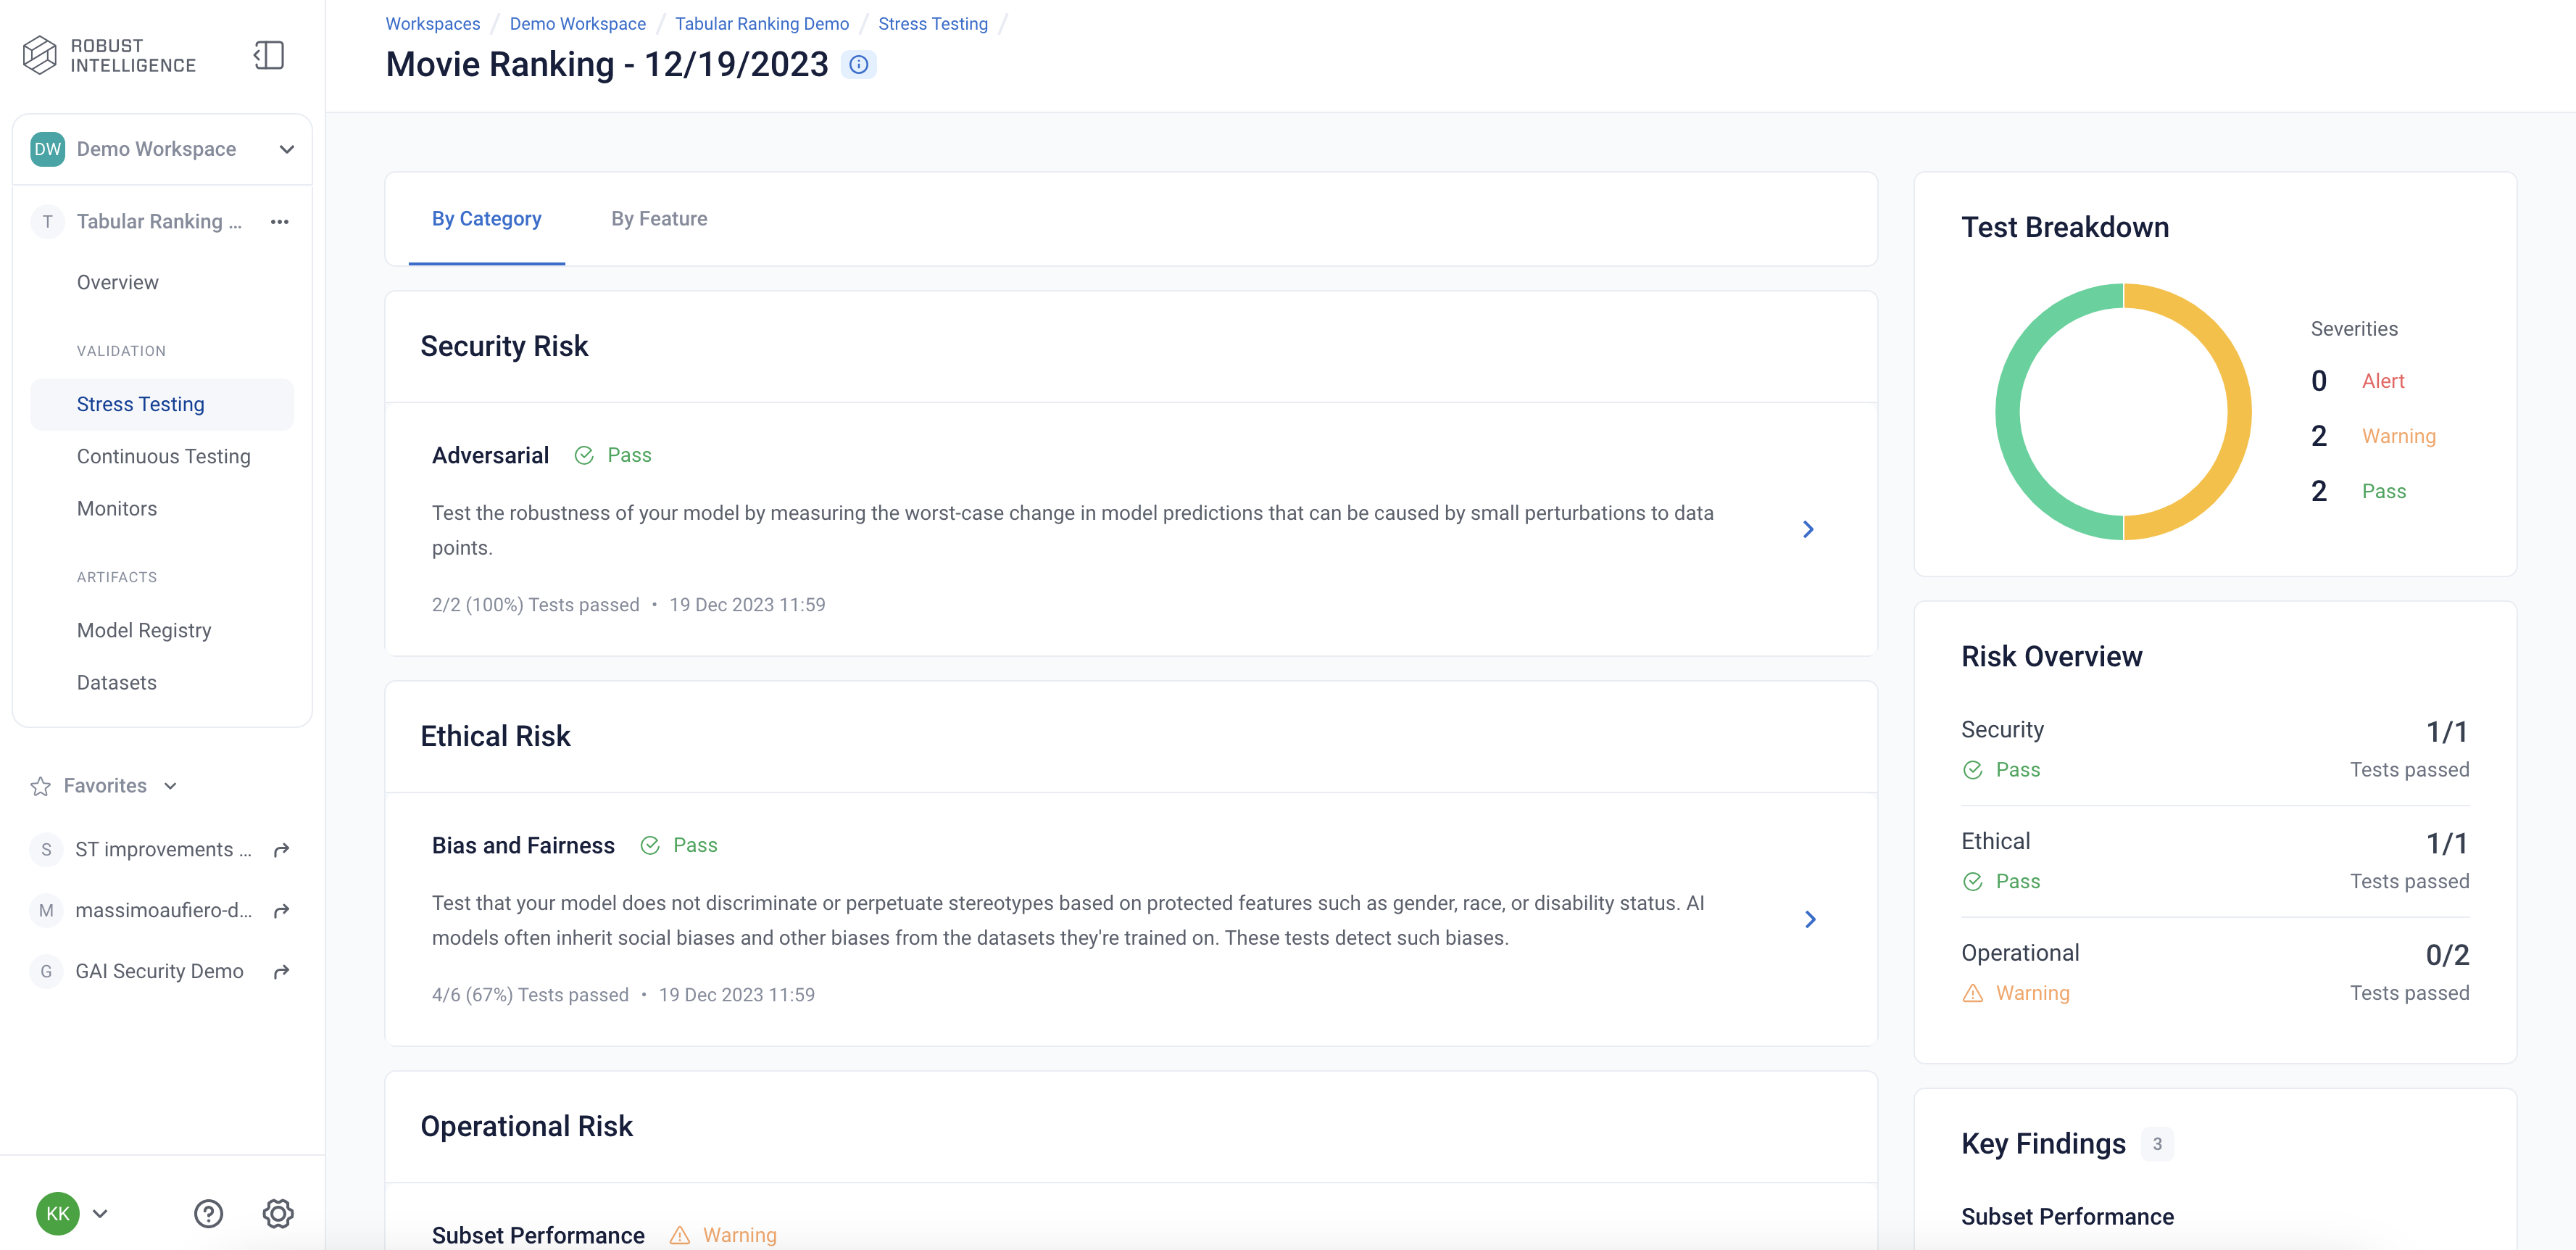
Stress tests are grouped first by risk categories and then into categories that measure various aspects of model robustness (model behavior, distribution drift, abnormal input, transformations, adversarial attacks, data cleanliness). Key findings to improve your model are aggregated on the category level as well. Tests are ranked by default by a shared severity metric. Clicking on an individual test surfaces more detailed information.
You can view the detailed results in the UI by running the below cell and redirecting to the generated link. This page shows granular results for a given AI Stress Test run.
[ ]:
test_run = stress_job.get_test_run()
test_run
Stress testing should be used during model development to inform us about various issues with the data and model that we might want to address before the model is deployed. The information is presented in an incident management view.
Analyzing the Results
Below you can see a snapshot of the results.
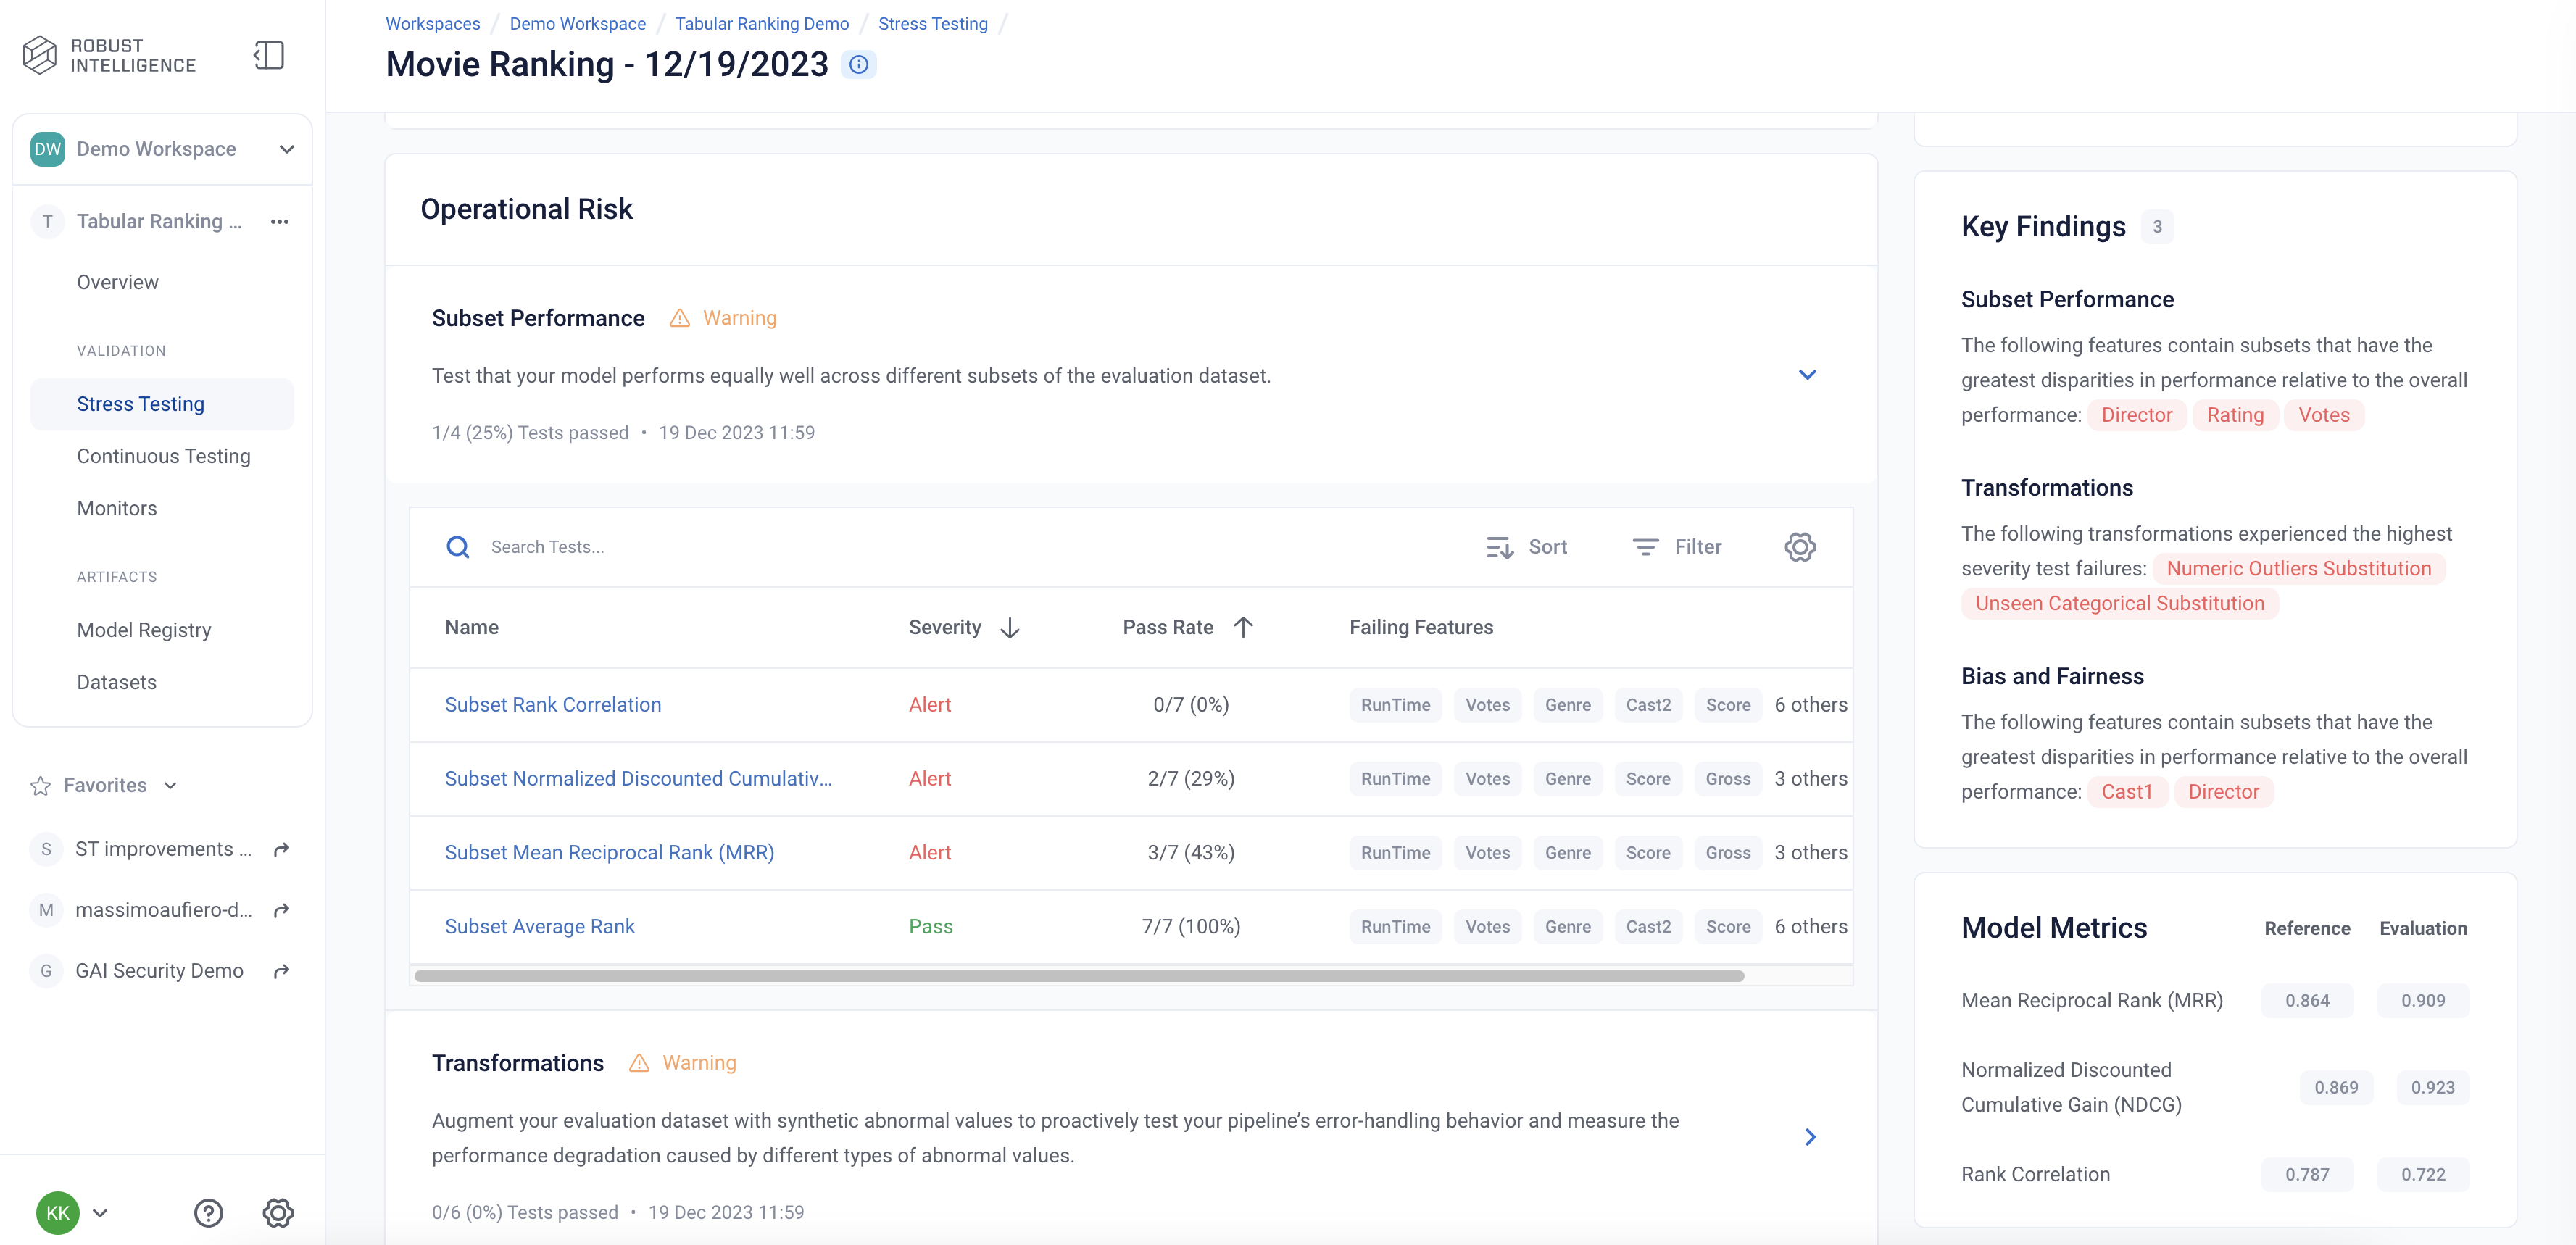
Here are the results of the Subset Performance tests. These tests can be thought as more detailed performance tests that identify subsets of underperformance. These tests help ensure that the model works equally well across different groups.
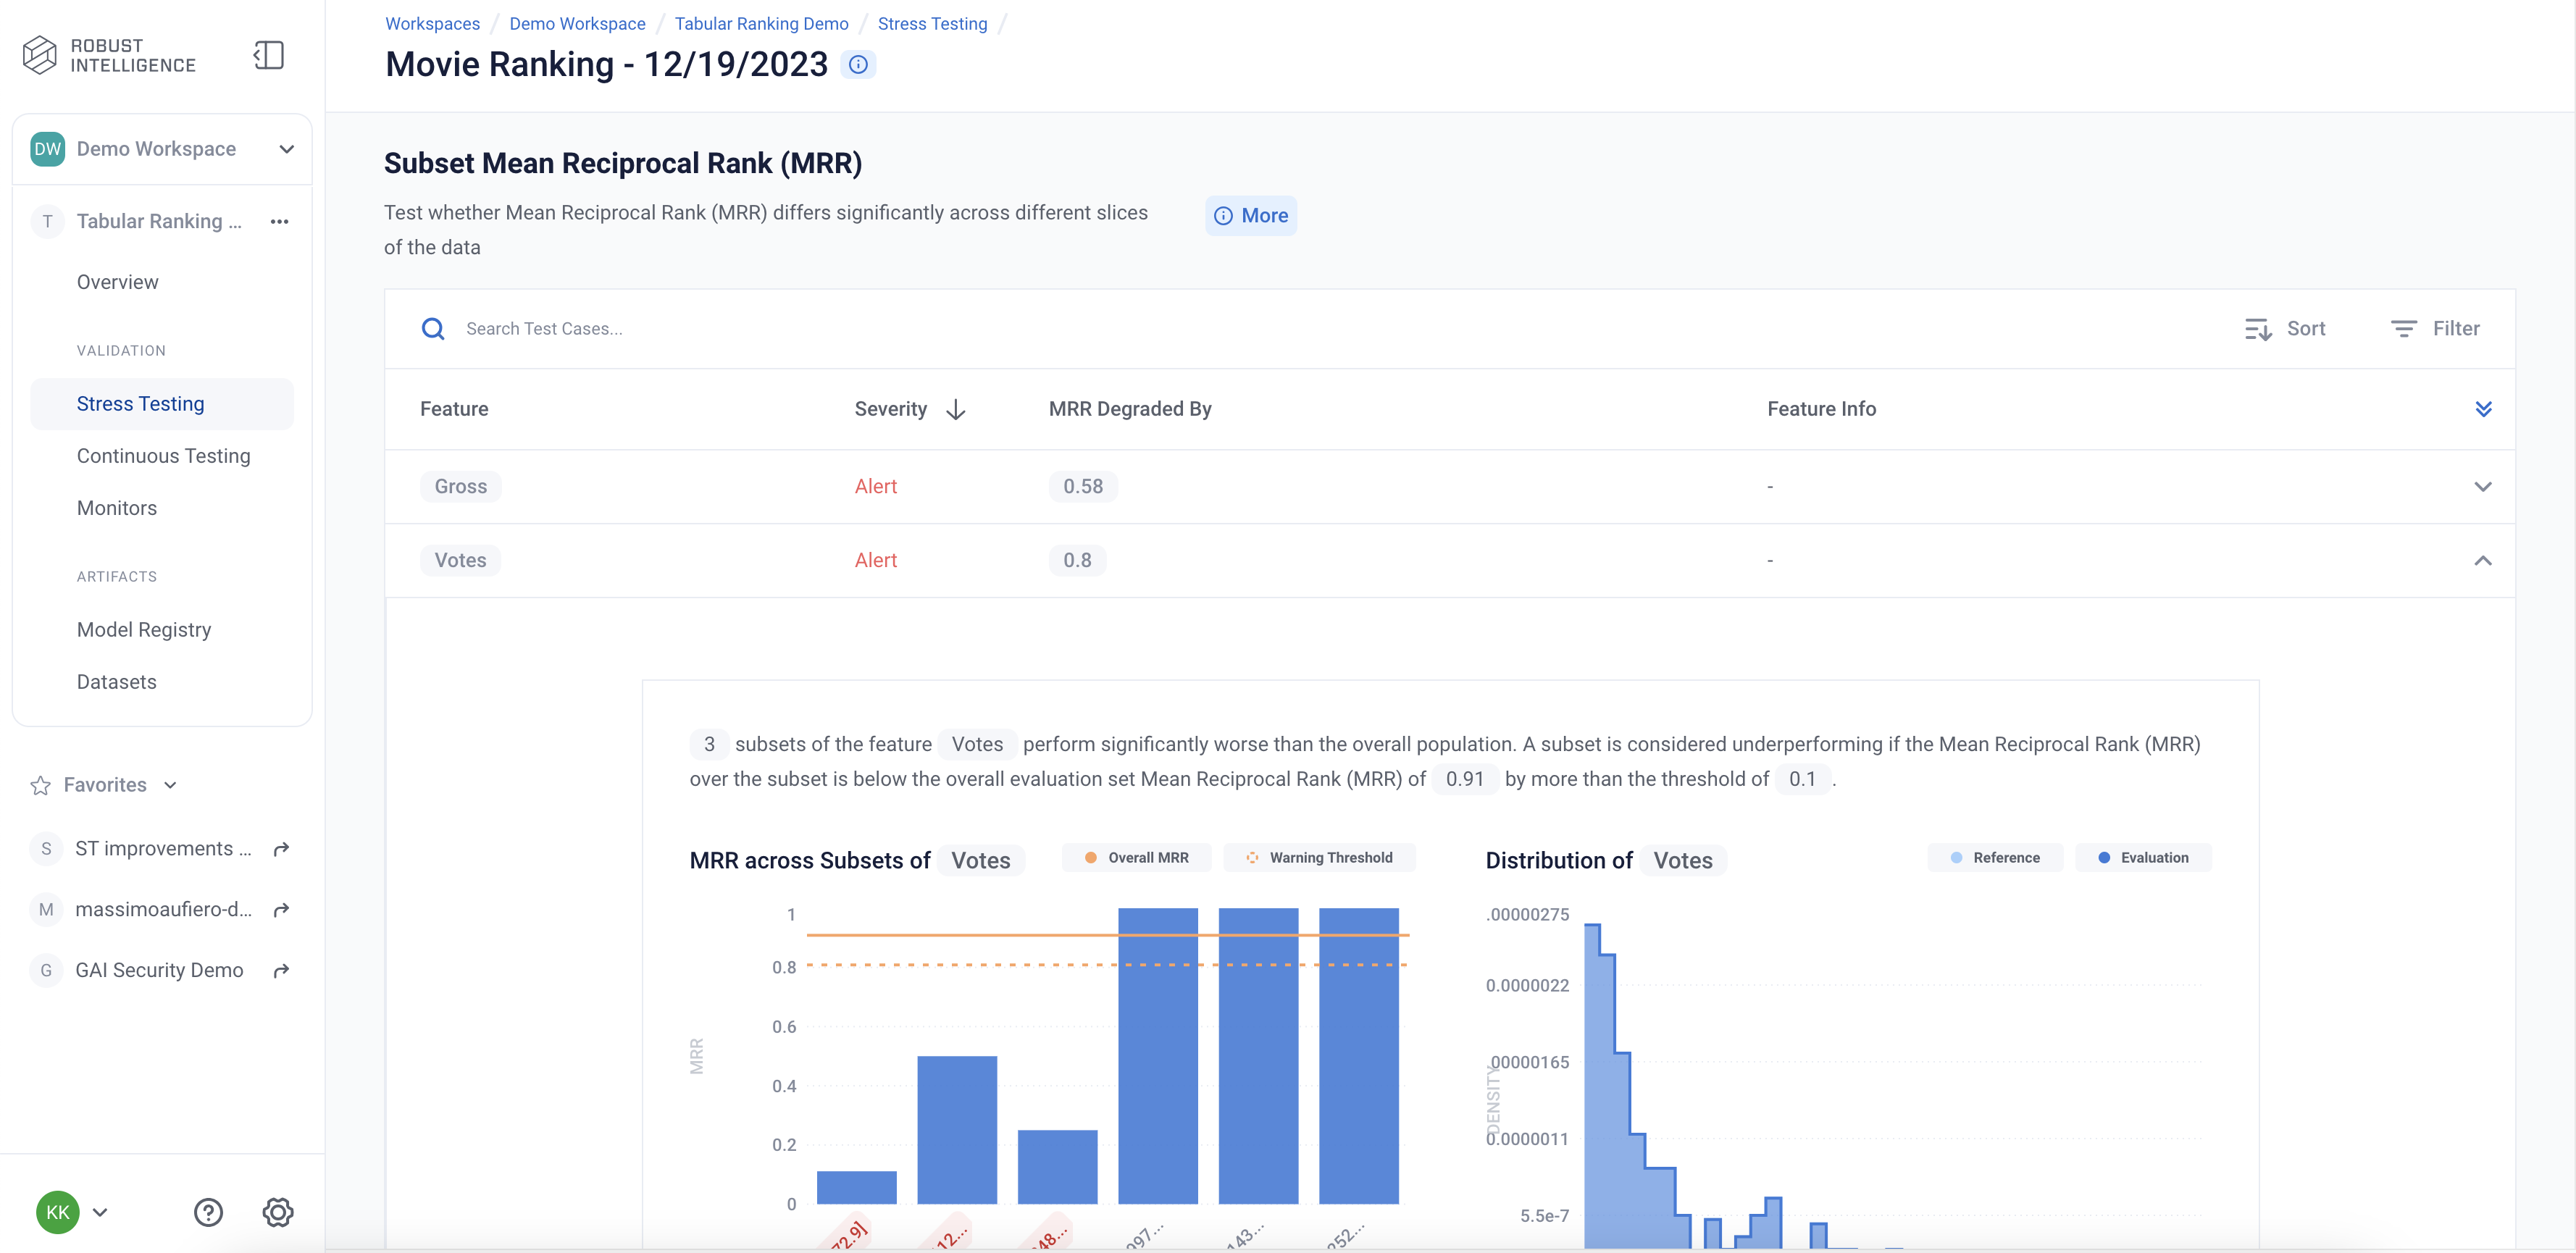
Below we are exploring the “Subset Mean Reciprocal Rank (MRR)” test cases for the feature “Votes”. We can see that even though the model has an overall MRR of 0.91, it performs poorly on certain subsets with low values of the “Votes” feature.
Deploy to Production and set up Continuous Testing
Once you have identified the best stress test run, you can deploy the associated model and set up Continuous Testing in order to automatically detect “bad” incoming data and statistically significant distributional drift.
[ ]:
from datetime import timedelta

ct_instance = project.create_ct(model_id, ref_dataset_id, timedelta(days=1))
Uploading a Batch of Production Data & Model Predictions to Continuous Testing
The model has been in production for some time, and new production data and model predictions have been collected and stored. Now, we will use Continuous Testing to track how the model performed.
Upload the Latest Batch of Production Data
[ ]:
dt = str(datetime.now())

if IS_SAAS:
    prod_s3_path = client.upload_file(
        Path('ranking/data/test.csv'),
        upload_path=UPLOAD_PATH,
    )
    prod_preds_s3_path = client.upload_file(
        Path('ranking/data/test_preds.csv'),
        upload_path=UPLOAD_PATH,
    )
else:
    prod_s3_path = f"{BLOB_STORE_URI}/{UPLOAD_PATH}/data/test.csv"
    prod_preds_s3_path = f"{BLOB_STORE_URI}/{UPLOAD_PATH}/data/test_preds.csv"

prod_dataset_id = project.register_dataset_from_file(
    f"prod_dataset_{dt}",
    prod_s3_path,
    data_params={"timestamp_col": "timestamp", "protected_features": ["Director", "Cast1"], **data_params},
    agent_id=AGENT_ID
)
project.register_predictions_from_file(
    prod_dataset_id,
    model_id,
    prod_preds_s3_path,
    pred_params=pred_params,
    agent_id=AGENT_ID
)
[ ]:
project.update_ct_categories(["TEST_CATEGORY_TYPE_MODEL_PERFORMANCE",
                                           "TEST_CATEGORY_TYPE_SUBSET_PERFORMANCE_DEGRADATION",
                                           "TEST_CATEGORY_TYPE_ABNORMAL_INPUTS",
                                           "TEST_CATEGORY_TYPE_DRIFT",
                                           "TEST_CATEGORY_TYPE_BIAS_AND_FAIRNESS"])
Run Continuous Testing over Batch of Data
[ ]:
ct_job = ct_instance.start_continuous_test(prod_dataset_id, agent_id=AGENT_ID)
ct_job.get_status(verbose=True, wait_until_finish=True)
ct_instance
Wait for a couple minutes and your results will appear in the UI.
Querying Results from Continuous Testing
After Continuous Testing has been set up and data has been uploaded for processing, the user can query the results throughout the entire uploaded history.
Obtain All Detection Events
[ ]:
events = [d.to_dict() for m in ct_instance.list_monitors() for d in m.list_detected_events()]
events_df = pd.DataFrame(events).drop(["id", "project_id", "firewall_id", "event_object_id", "description_html", "last_update_time"], axis=1)
events_df.head()
CT Results
The Continuous Tests operate at the batch level and provide a mechanism to monitor the health of ML deployments in production. They allow the user to understand when errors begin to occur and surface the underlying drivers of such errors.
You can explore the results in the UI by running the below cell and redirecting to the generated link.
[ ]:
ct_instance
Analyzing CT Results
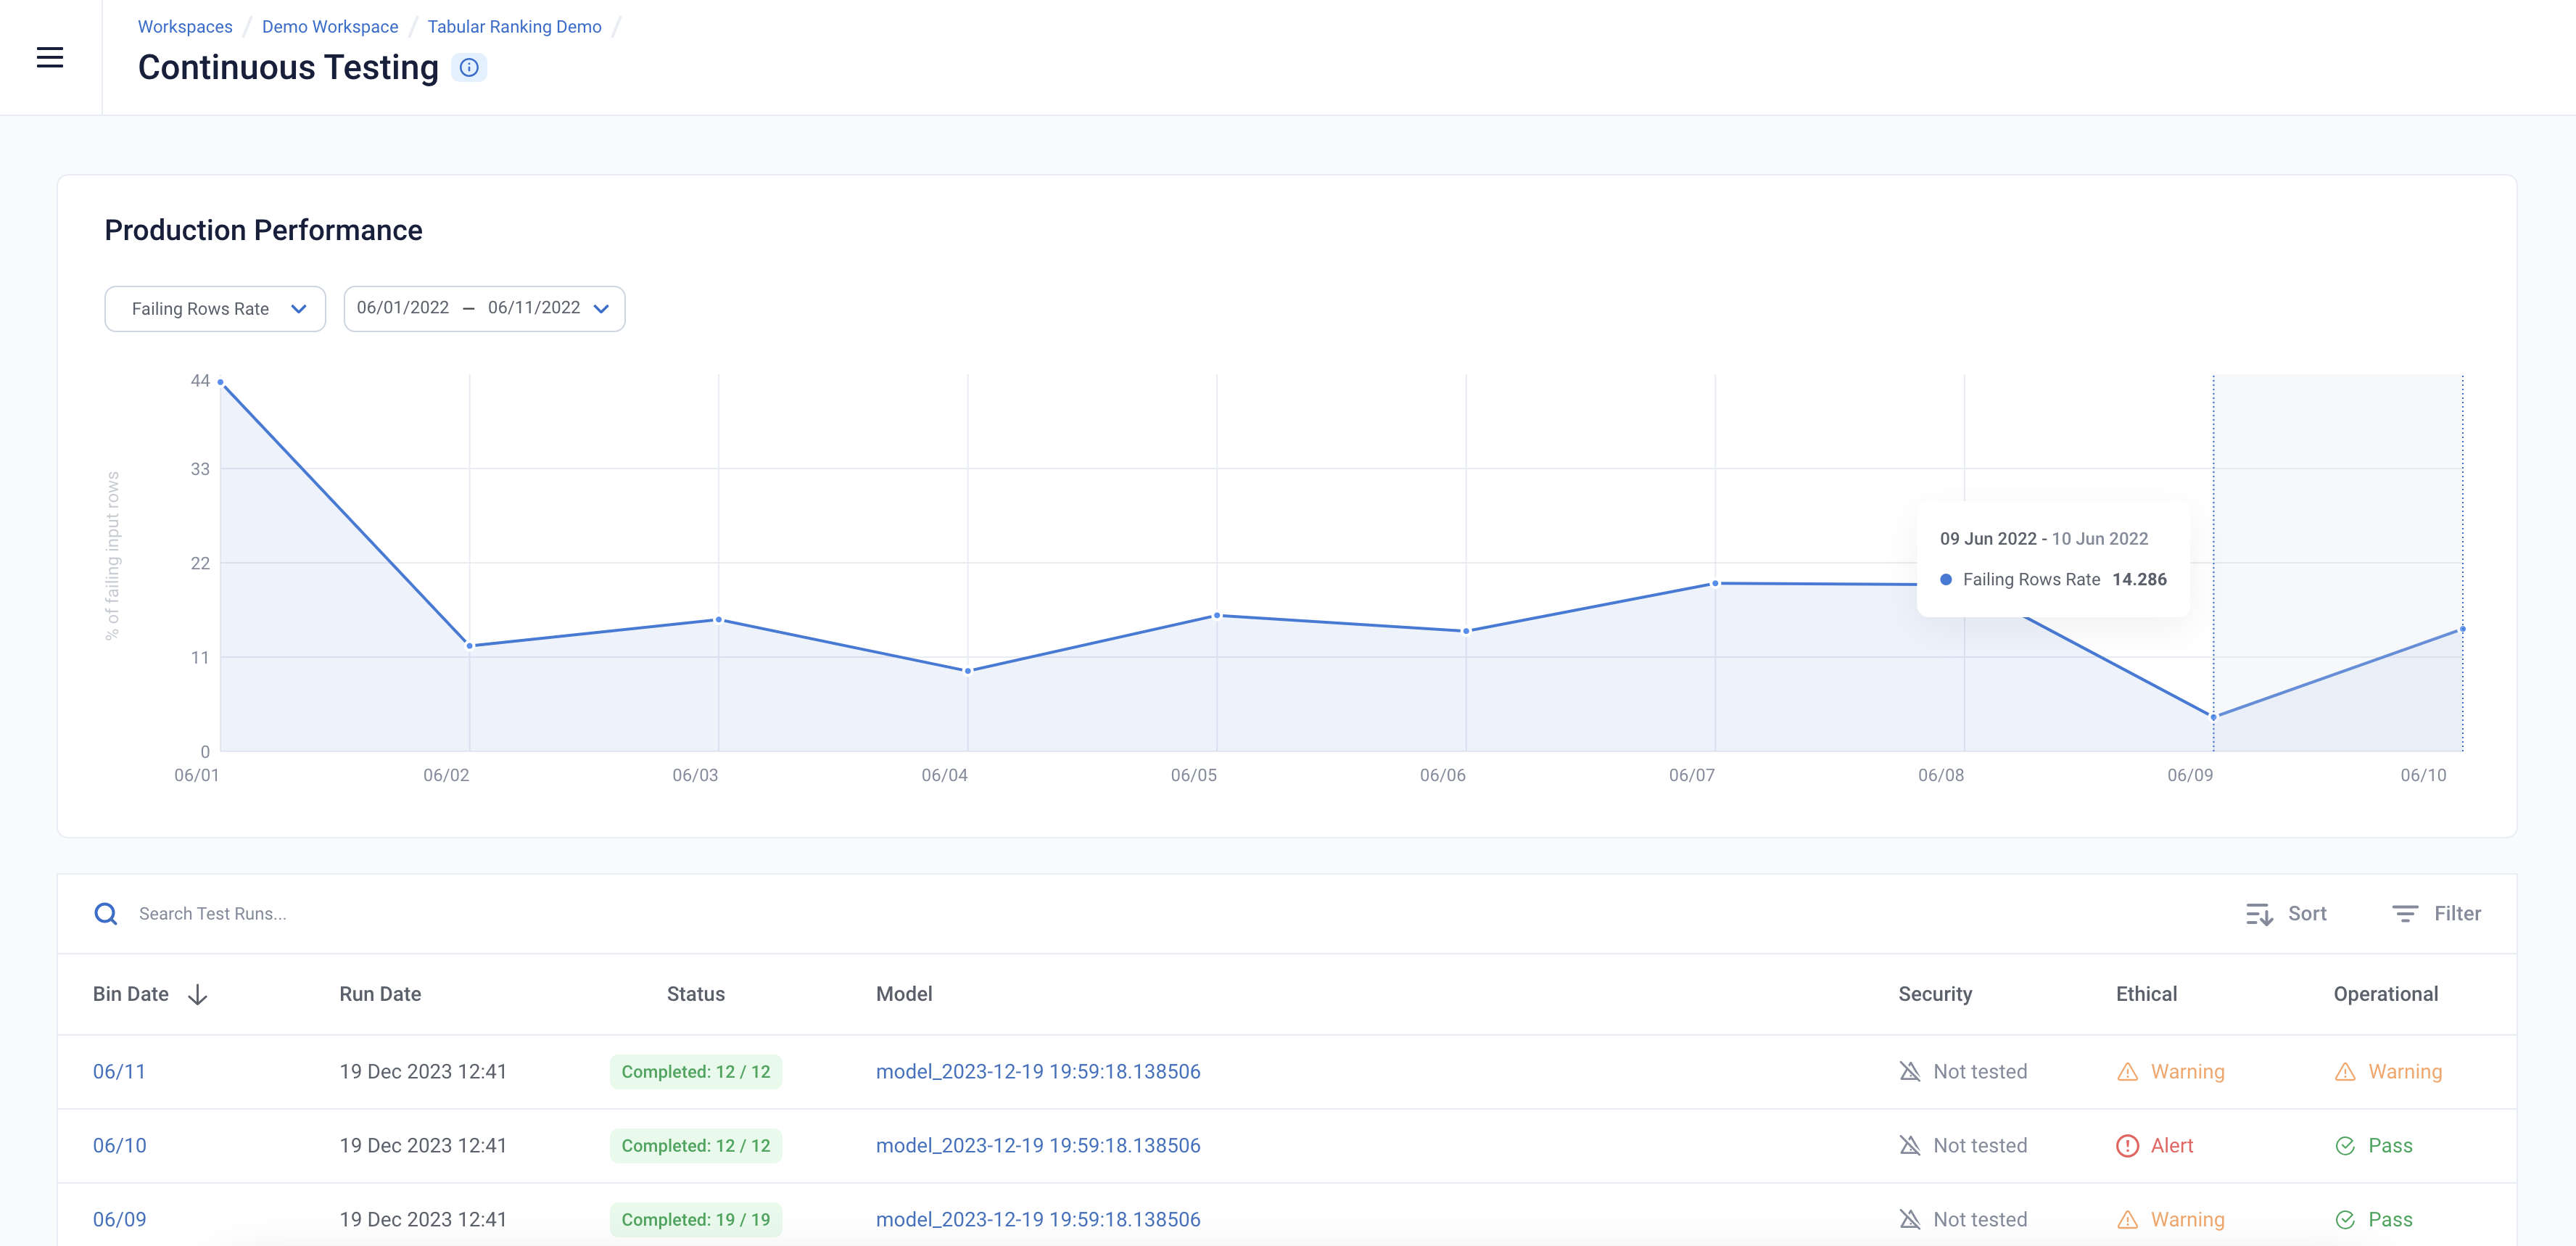
Failing Rows Rate stays steady (and low) over time - In the below image, we can see that the Failing Rows Rate remains fairly low (<15%) over time, and does not trend upward significantly.
Summary:
In this Notebook, RIME and the SDK helped with ingesting and investigating tabular pointwise ranking information which:
✅ Measured impact of failing tests on model performance
✅ Assisted with modeling and experiment tracking
✅ Identified root-cause analysis of underlying issues in data and model (e.g. Numerical Outliers and Bad Inputs)
✅ Continuously testing production data and model which enforced better ml integrity and posture (e.g. Highlighting changes in data schema, data malformations, cardinality changes, out of range values, missing values)
